There’s one thing every photographer learns the hard way: Getting the “perfect shot” in-camera is next to impossible. Ask any experienced portrait photographer, and 9/10, they’ll tell you that the secret to great portraits lies in their post-production process.
Often, photographers even intentionally make their clicks imperfect during shoots, such as by underexposing them, to get the right look when they’re editing photos!
That’s how important having a post-shoot portrait editing workflow is. And now with AI-powered tools, photographers can achieve their artistic vision while drastically cutting down the time spent on tedious edits.
If you’ve been doing this for a while, we’re probably preaching to the choir but don’t leave yet — we’re going to help you refine your process so it’s even more efficient. And if you don’t have one yet, then you’re in just the right place. Let’s dive right in.
What is AI Portrait Editing?
First, let’s understand what AI portrait editing actually means for professional photographers.
AI portrait editing uses machine learning algorithms to analyze images and make intelligent editing decisions based on patterns learned from thousands of professional photos — both trained by teams like ours and your own pictures if you choose to create your personal AI profile. Unlike basic presets or filters, AI editing tools can recognize specific elements in your portraits, like faces, skin tones, lighting conditions, and more, and apply appropriate adjustments.
The key benefits include:
- Time savings: Automating repetitive tasks like culling, editing, and retouching
- Consistency: Maintaining a cohesive look across large batches of images
- Enhanced creativity: Freeing you to focus on artistic decisions rather than technical corrections
- Faster client delivery: Reducing turnaround times without sacrificing quality
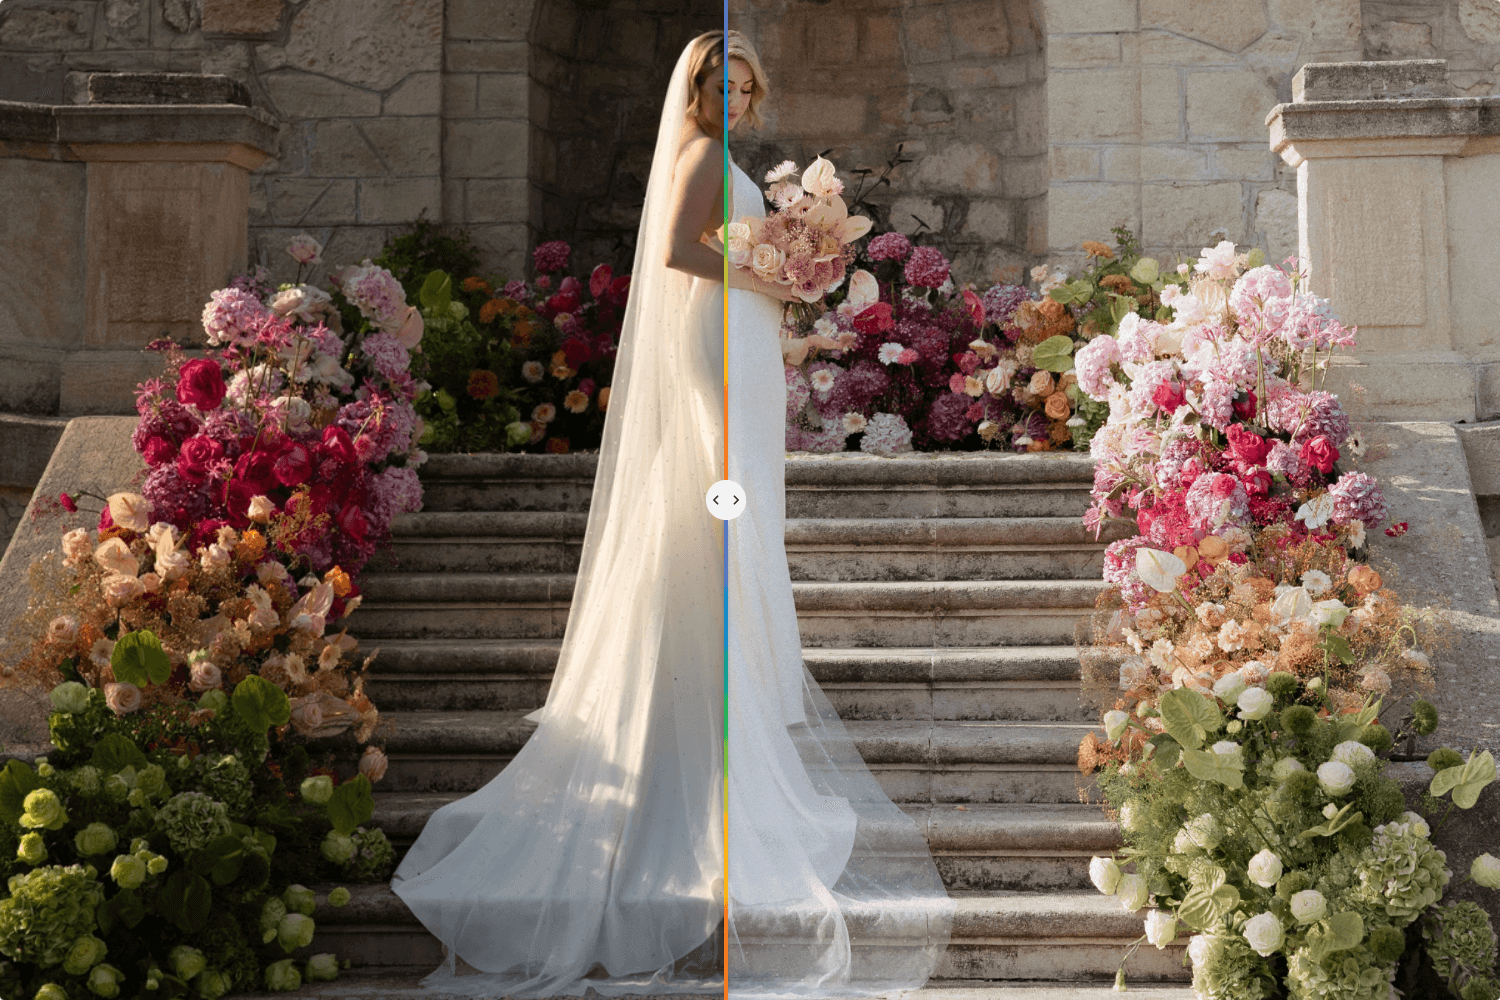
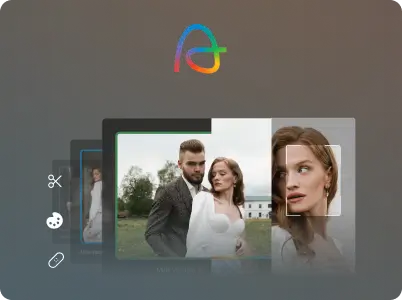
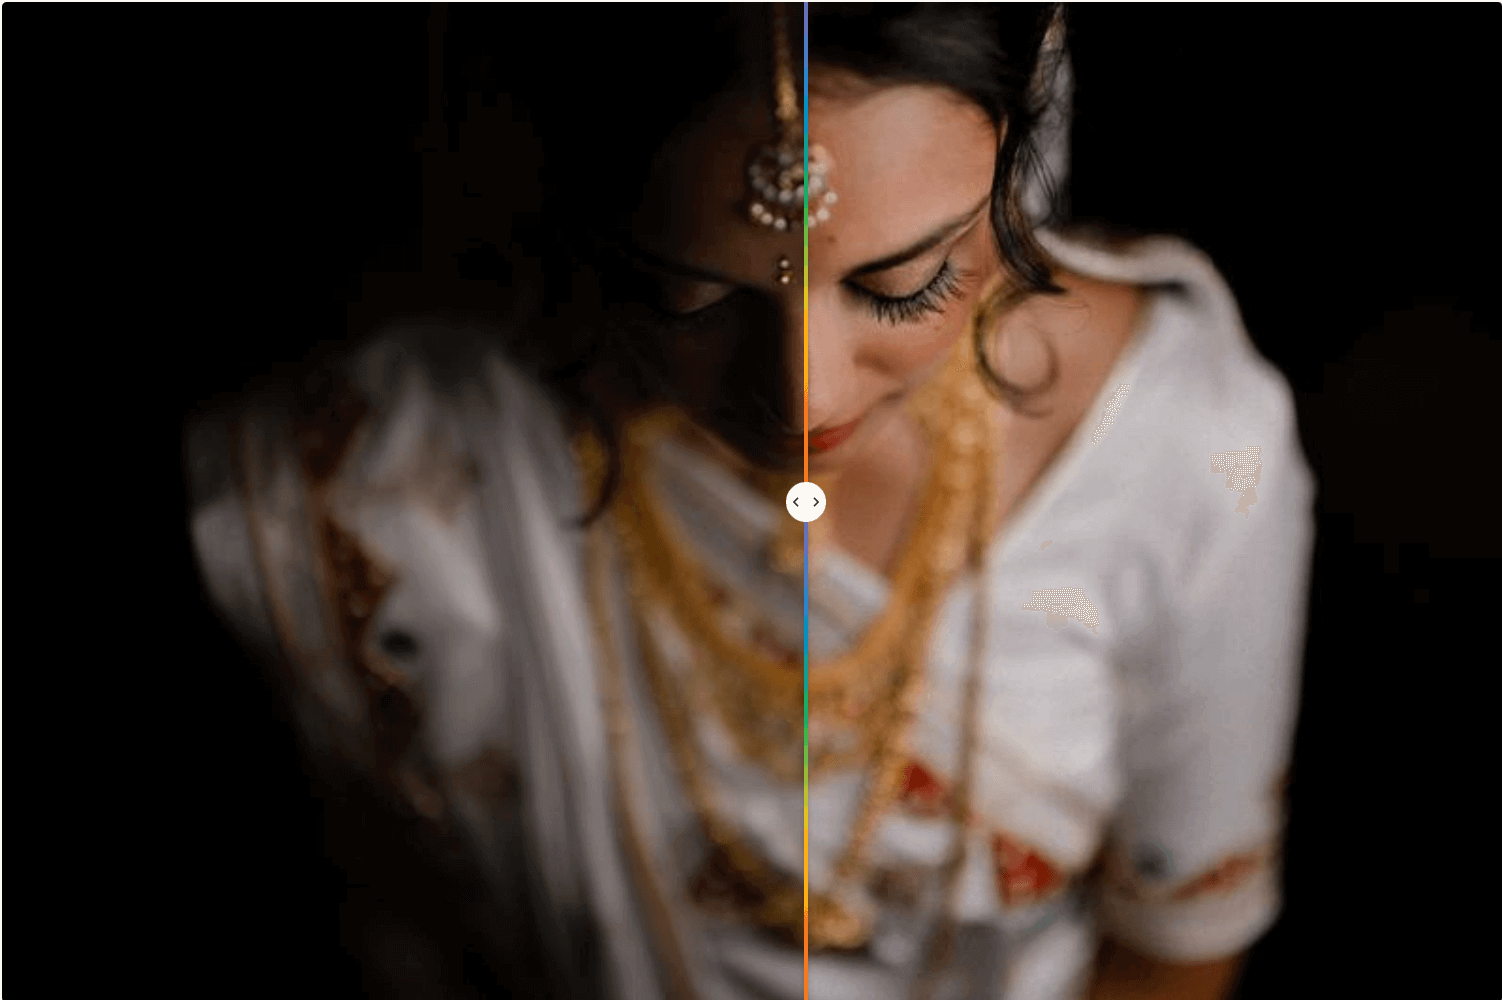
Before vs After using Chérie AI Style on Aftershoot
The basics, before we begin:
Before diving into the process of an efficient portrait editing workflow, let’s cover a few essential best practices.
Shoot in RAW
You’ve probably heard this before but for professional photographers, shooting in RAW format, instead of JPEG, is the way to go. This is because RAW files are uncompressed and thus retain more data as compared to formats like JPEG, which gives you more to work with during the editing process.
Opt for the right culling & editing software
The tools you use can either define your post-processing workflow or hinder it. For this guide, we’ll be using Aftershoot and Lightroom.
Know there’s no “one-size-fits-all”
Clients are attracted to specific photographers due to their own unique styles and strengths when capturing portraits. You’ll want to experiment to find your own unique style and a corresponding editing workflow. No two photographers have the same exact workflow, as what works for one could be inefficient for the other.
Over time, and with trial and error, you’ll identify your ideal process and build harmony between what to do in-camera during photo shoots, what to go in to edit later, and in what order to do so.
Now, let’s break down an optimal portrait editing workflow using Aftershoot as your primary AI assistant, with Lightroom for finishing touches.
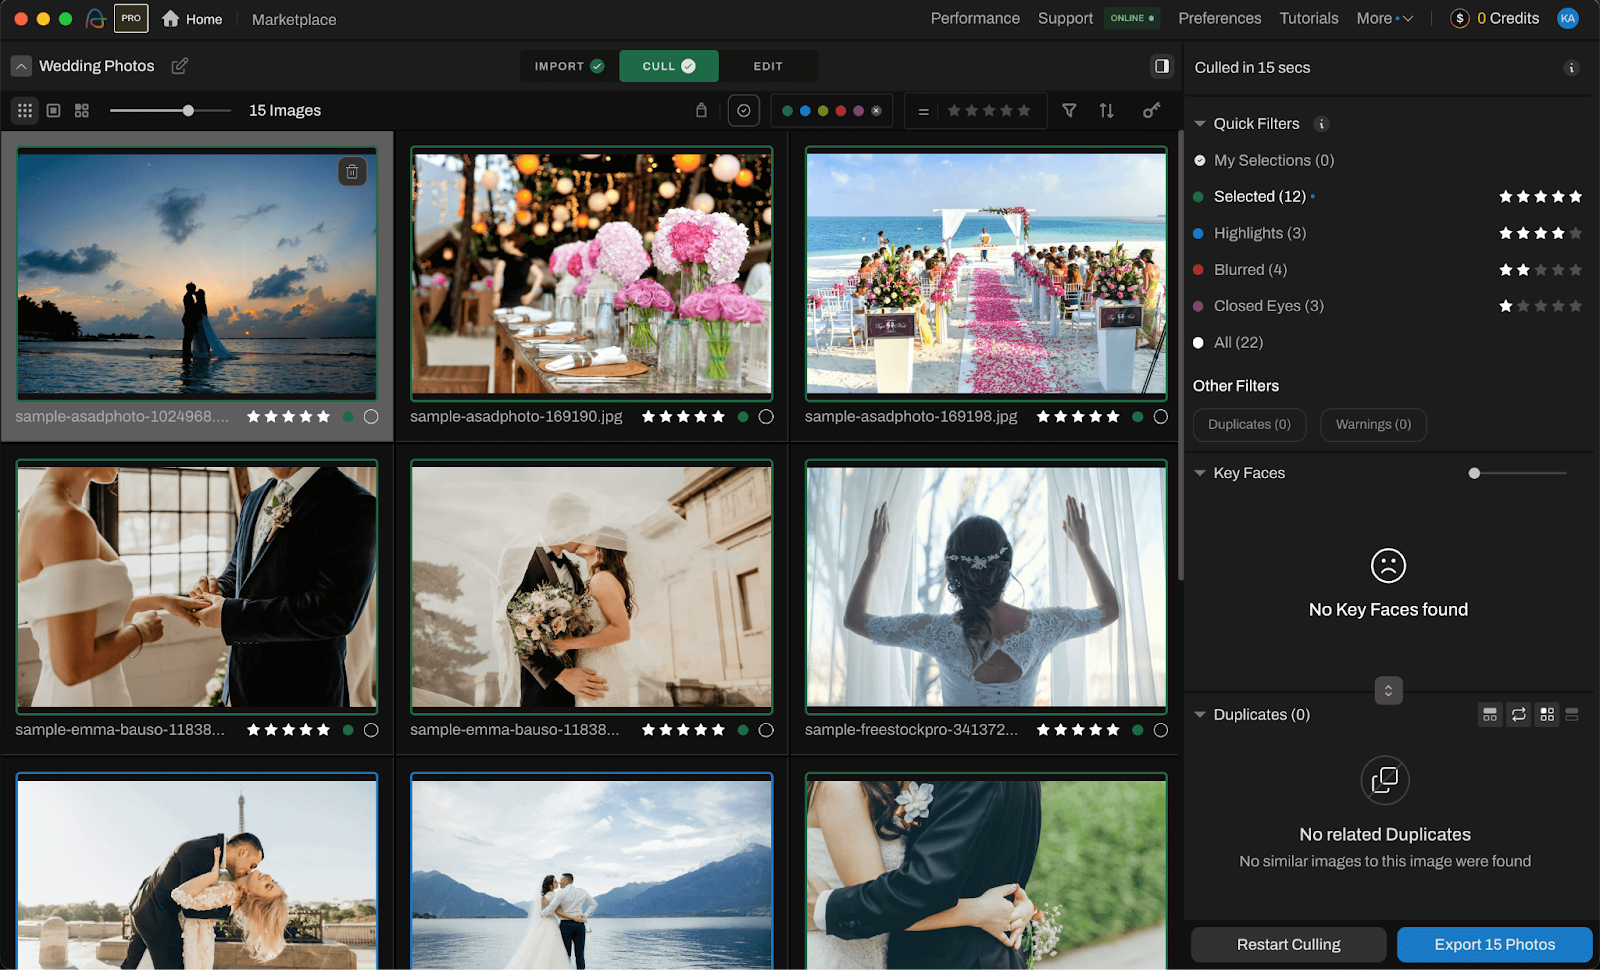
Step 1: Import all your photos into Aftershoot and start culling
The first bottleneck in any portrait editing workflow is culling. Manually sorting through hundreds of images to select the best shots is incredibly time-consuming and often subjective. This is where you head to Aftershoot.
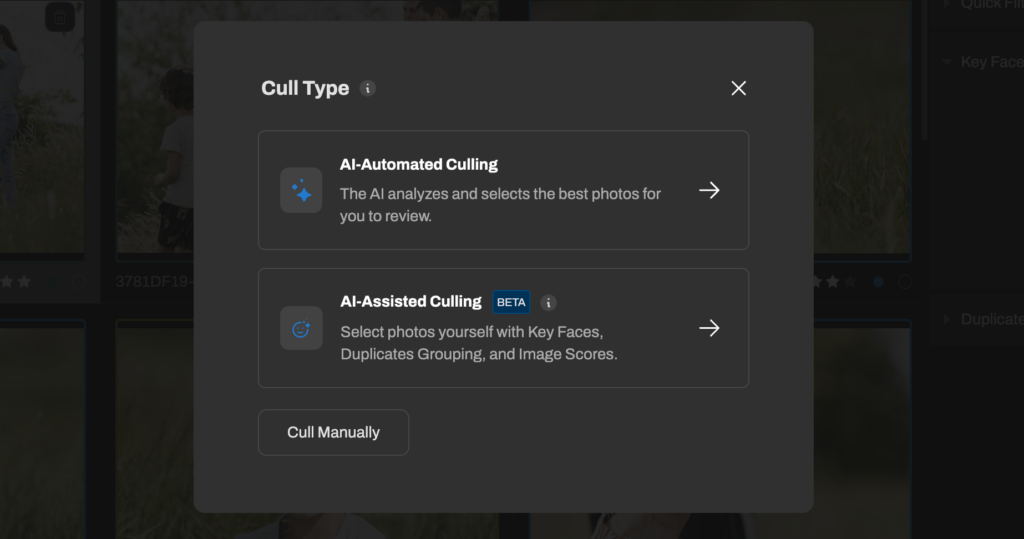
Aftershoot’s AI culling features
- Flexible selection modes: Two different AI culling modes, AI-Automated Culling, and AI-Assisted Culling, to allow you the flexibility to choose the amount of control and AI assistance you’d like while culling photos.
- Duplicate detection: Intelligently identifies and groups similar images, highlighting the best shot from each set. This prevents redundant selections and helps maintain a clean, curated image collection.
- Blurry image filtering: Automatically flags and separates out-of-focus or technically imperfect images. Helps maintain high-quality standards without manual review.
- Closed eyes recognition: Detects and flags images where subjects have their eyes closed, ensuring you don’t accidentally select unflattering shots.
- Facial feature analysis: Analyzes key facial details to help evaluate image quality and subject presentation.
- Intelligent image scoring: Generates AI-powered quality ratings to help quickly assess and compare images. You can also apply custom color labels and star ratings to match your existing workflow.
- Shoot-specific preferences: Adjust AI parameters based on the type of photoshoot.
Steps to cull your images with Aftershoot:
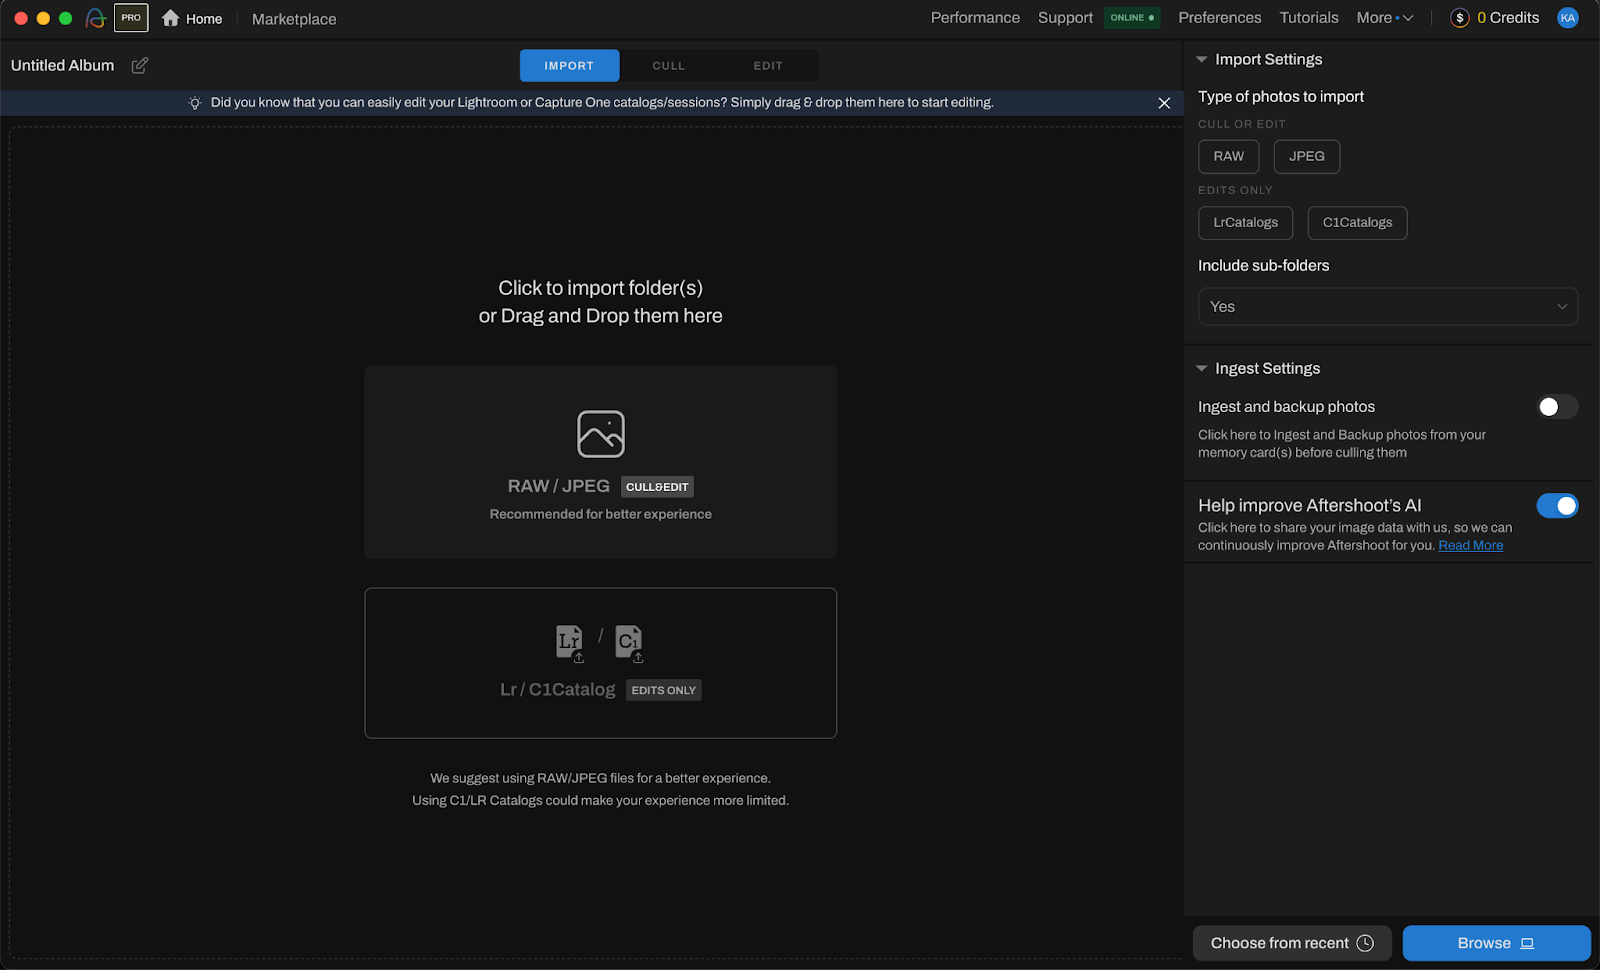
1. Import your images
Seamlessly import your RAW (or JPEG) files directly into Aftershoot from your memory card or hard drive.
2. Let AI work its magic
Initiate the culling process and let Aftershoot analyze your images. This usually takes just a few minutes, depending on the size of your album.
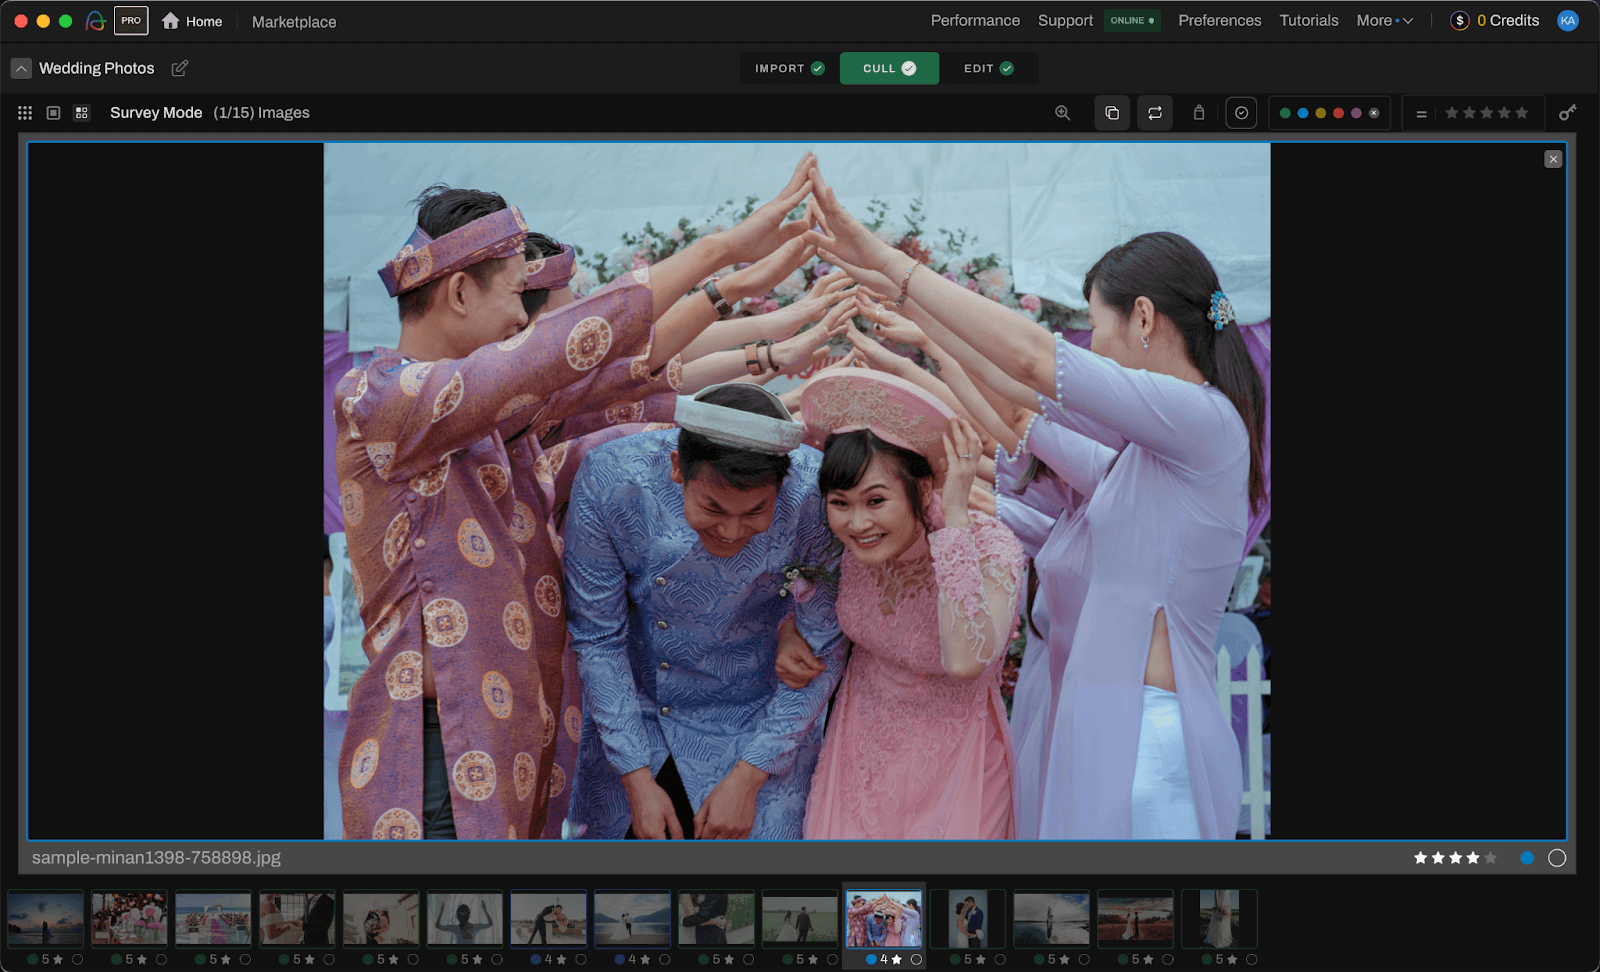
3. Review and refine
Quickly review Aftershoot’s selections. Aftershoot offers three different views for you to review your photos: Grid, Loupe, and Survey Mode. You have the final say – easily accept, reject, swap with duplicates, and further refine the AI’s suggestions.
By implementing AI culling as the first step in your portrait editing workflow, you’re building a foundation of efficiency and objectivity, setting the stage for a faster and more focused editing process.
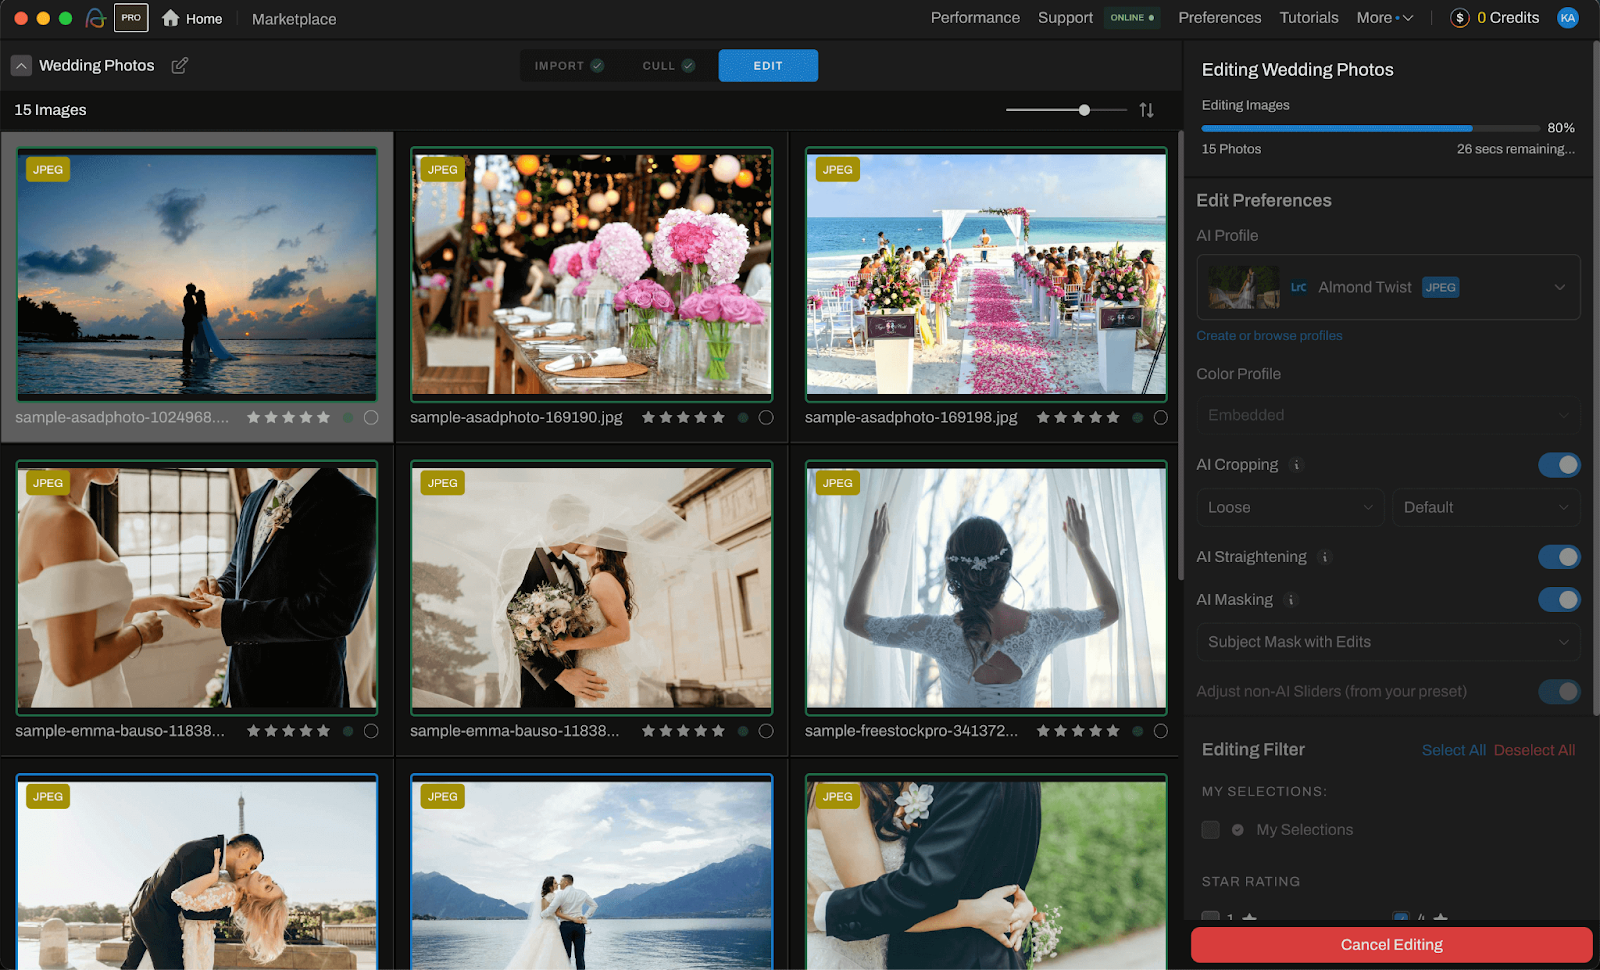
Step 2: Use AI to automatically edit your portraits in your own unique style
Once you’ve culled your images with Aftershoot, you can leverage its AI editing capabilities to perform basic adjustments according to your photography style.
There are two stages in photo editing: global edits and detailed edits. This first step is about establishing a consistent starting point for your selected portraits, saving you even more time in your edits.
Aftershoot’s AI editing features automatically apply basic adjustments to your images, including:
- Exposure correction: Ensuring consistent brightness levels across your photoshoot.
- White balance adjustment: Correcting color casts and achieving accurate skin tones.
- Contrast and clarity adjustments: Enhancing detail and creating a more polished look.
- Noise reduction: Minimizing unwanted noise, especially in low-light portraits.
Aftershoot’s AI editing features:
- Customizable AI styles: Try out a vast number of AI editing styles created by our team and other photographers, available in our marketplace, to find your style. You can even train and save your own AI profiles for consistent results across different photoshoots.
- AI Masking: Intelligently detects and separates subjects from backgrounds and image elements for precise, targeted editing. You can choose to apply your mask with edits or create the subject masks using AI and edit later.
- AI cropping and straightening: Used AI to identify optimal image composition and automatically correct image angles, cropping, and alignment.
- Batch processing: Apply consistent basic edits to your entire culled selection with a single click.
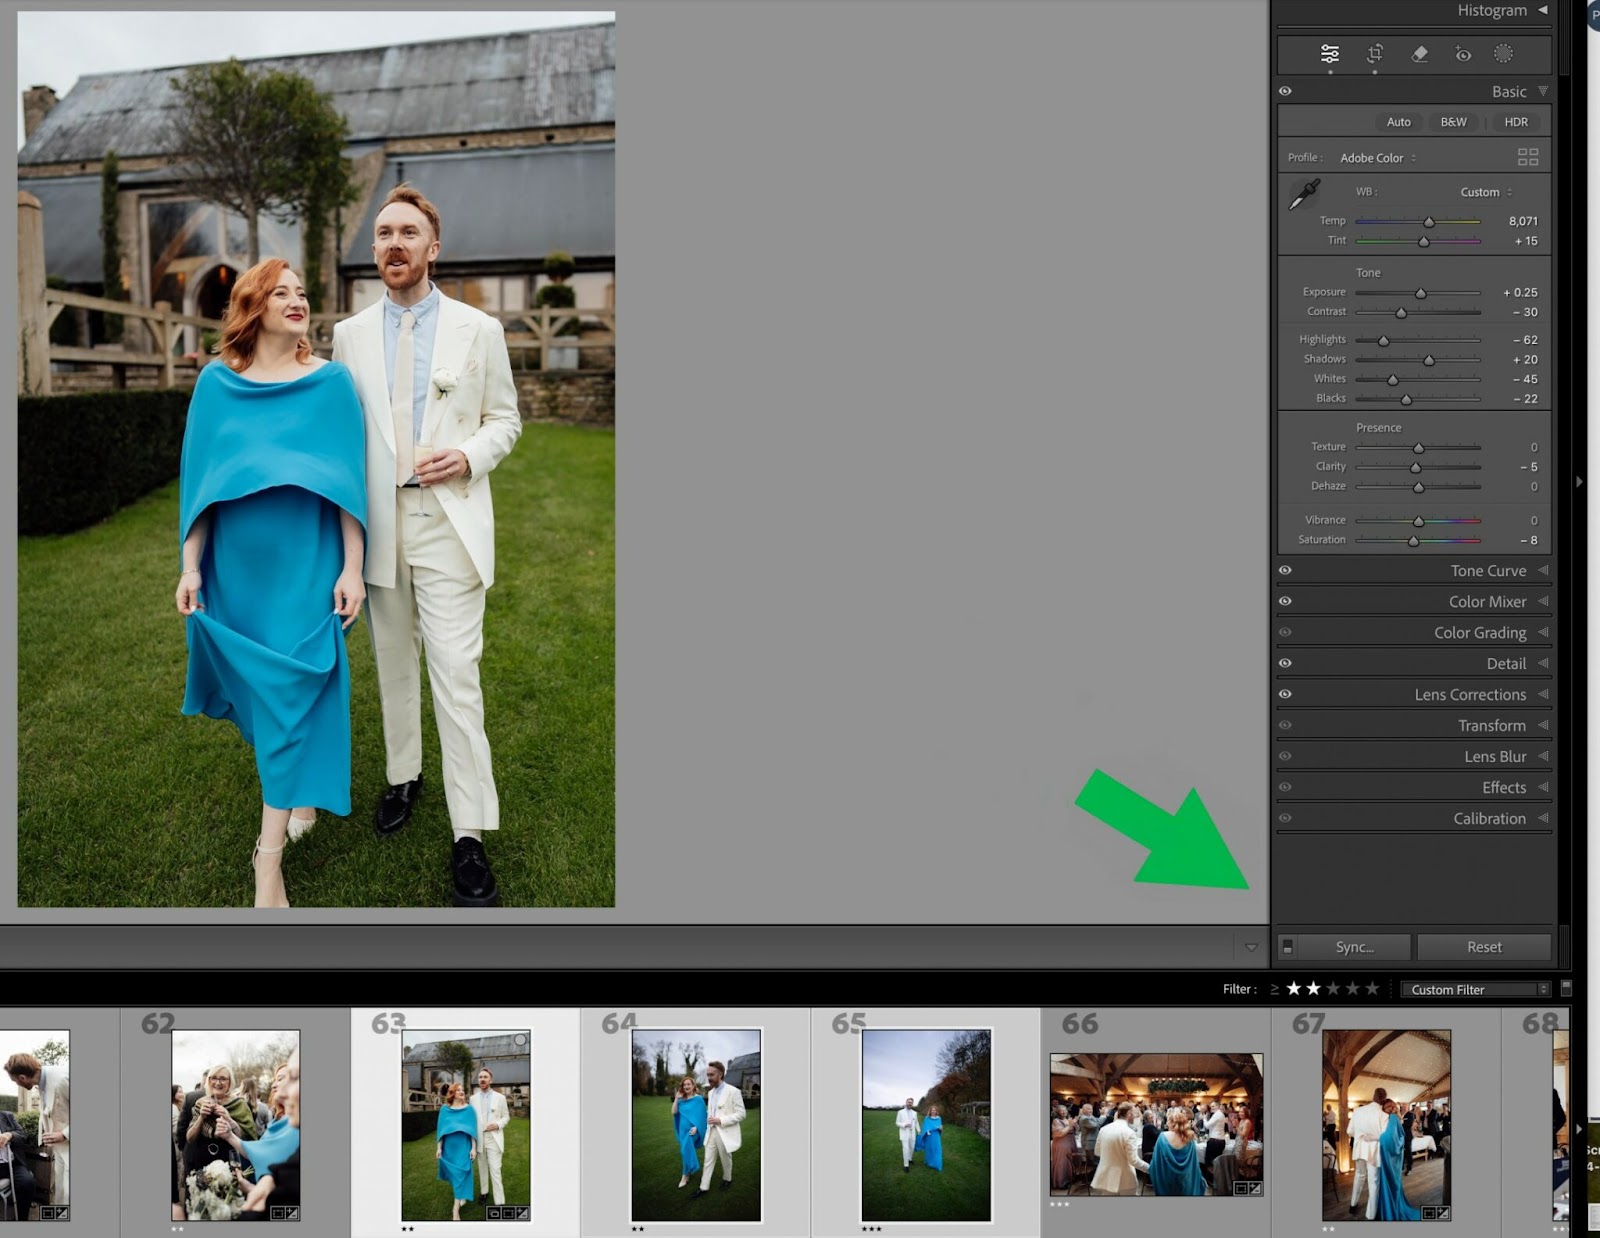
Steps to edit your images with Aftershoot:
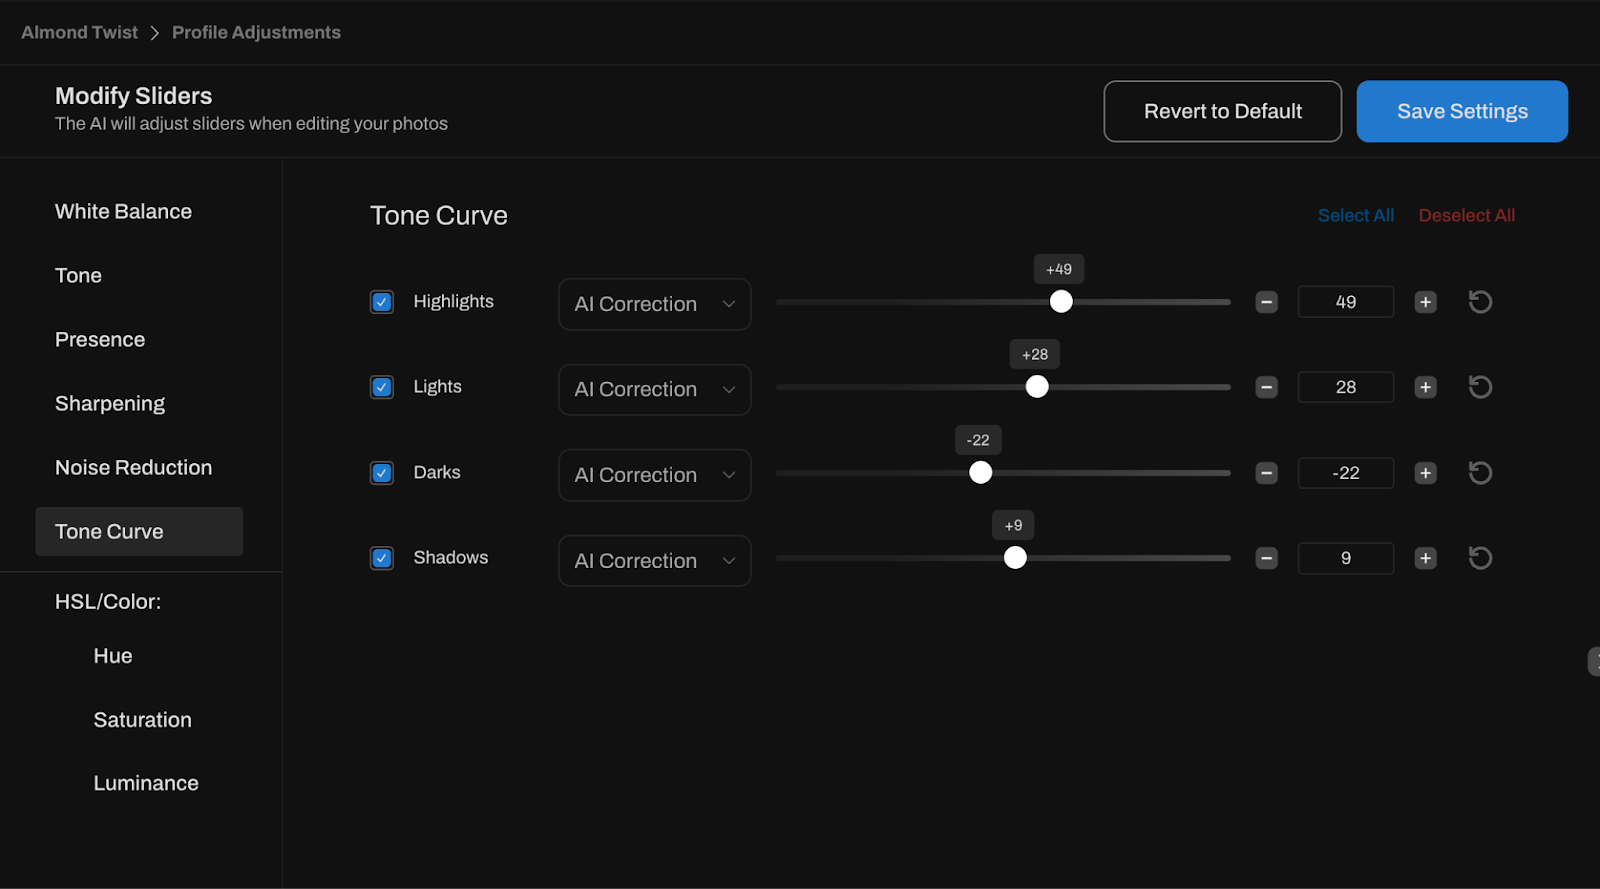
1. Choose your AI Editing Profile
Choose from various AI profiles designed for different photography styles. Some of our favorites for portrait editing are Chérie, Lilly Red, Kreate Naturelle, and our own Justin Benson’s The Founder Style. These are customizable, so you can adjust settings like White Balance, Hue, Saturation, and more, according to your requirements. (Here’s a quick walkthrough video on how to use AI styles to edit your photos)
If you have a unique editing style that you’d like to train the AI to match, yes, you can also create your own custom profile.
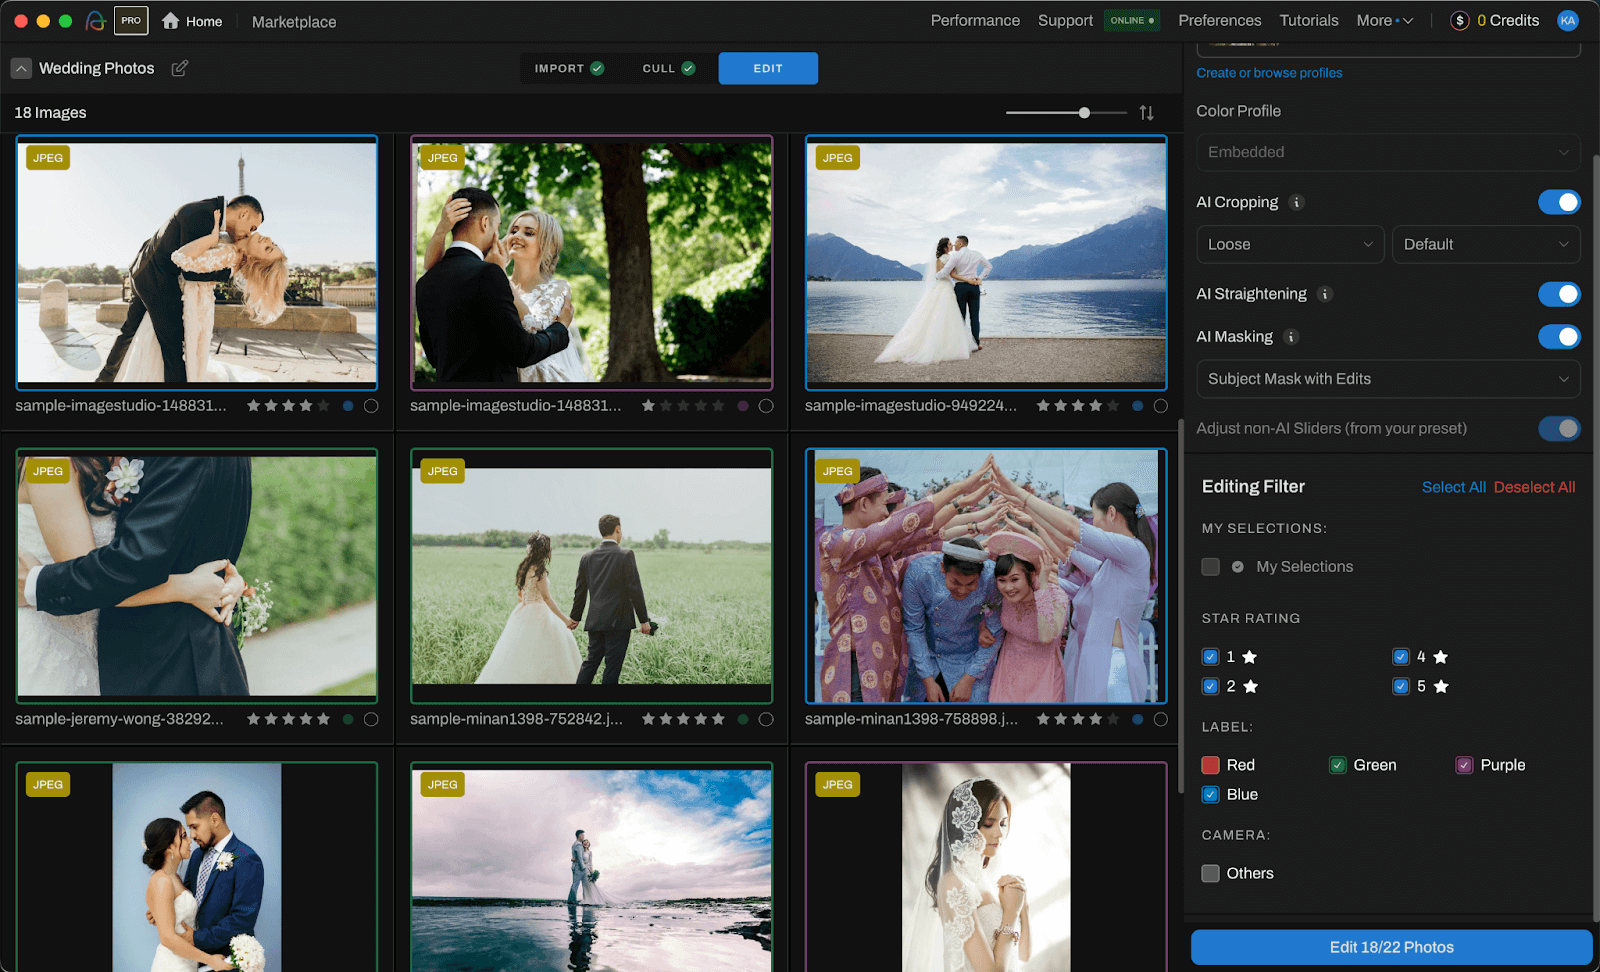
2. Set your editing filters and preferences
Choose your preferred color profile and set your AI masking, straightening, and cropping preferences. You can also choose to edit all the photos in your album or only a selected few by filtering based on your star ratings and labels.
3. Apply AI Edits
With a single click, apply your chosen AI profile to your entire culled image selection.
With AI photo editing, you’ve essentially prepped your portraits for the final creative editing stage. You’re eliminating repetitive tasks and ensuring consistency, allowing you to move into Lightroom or Capture One with a significant head start.
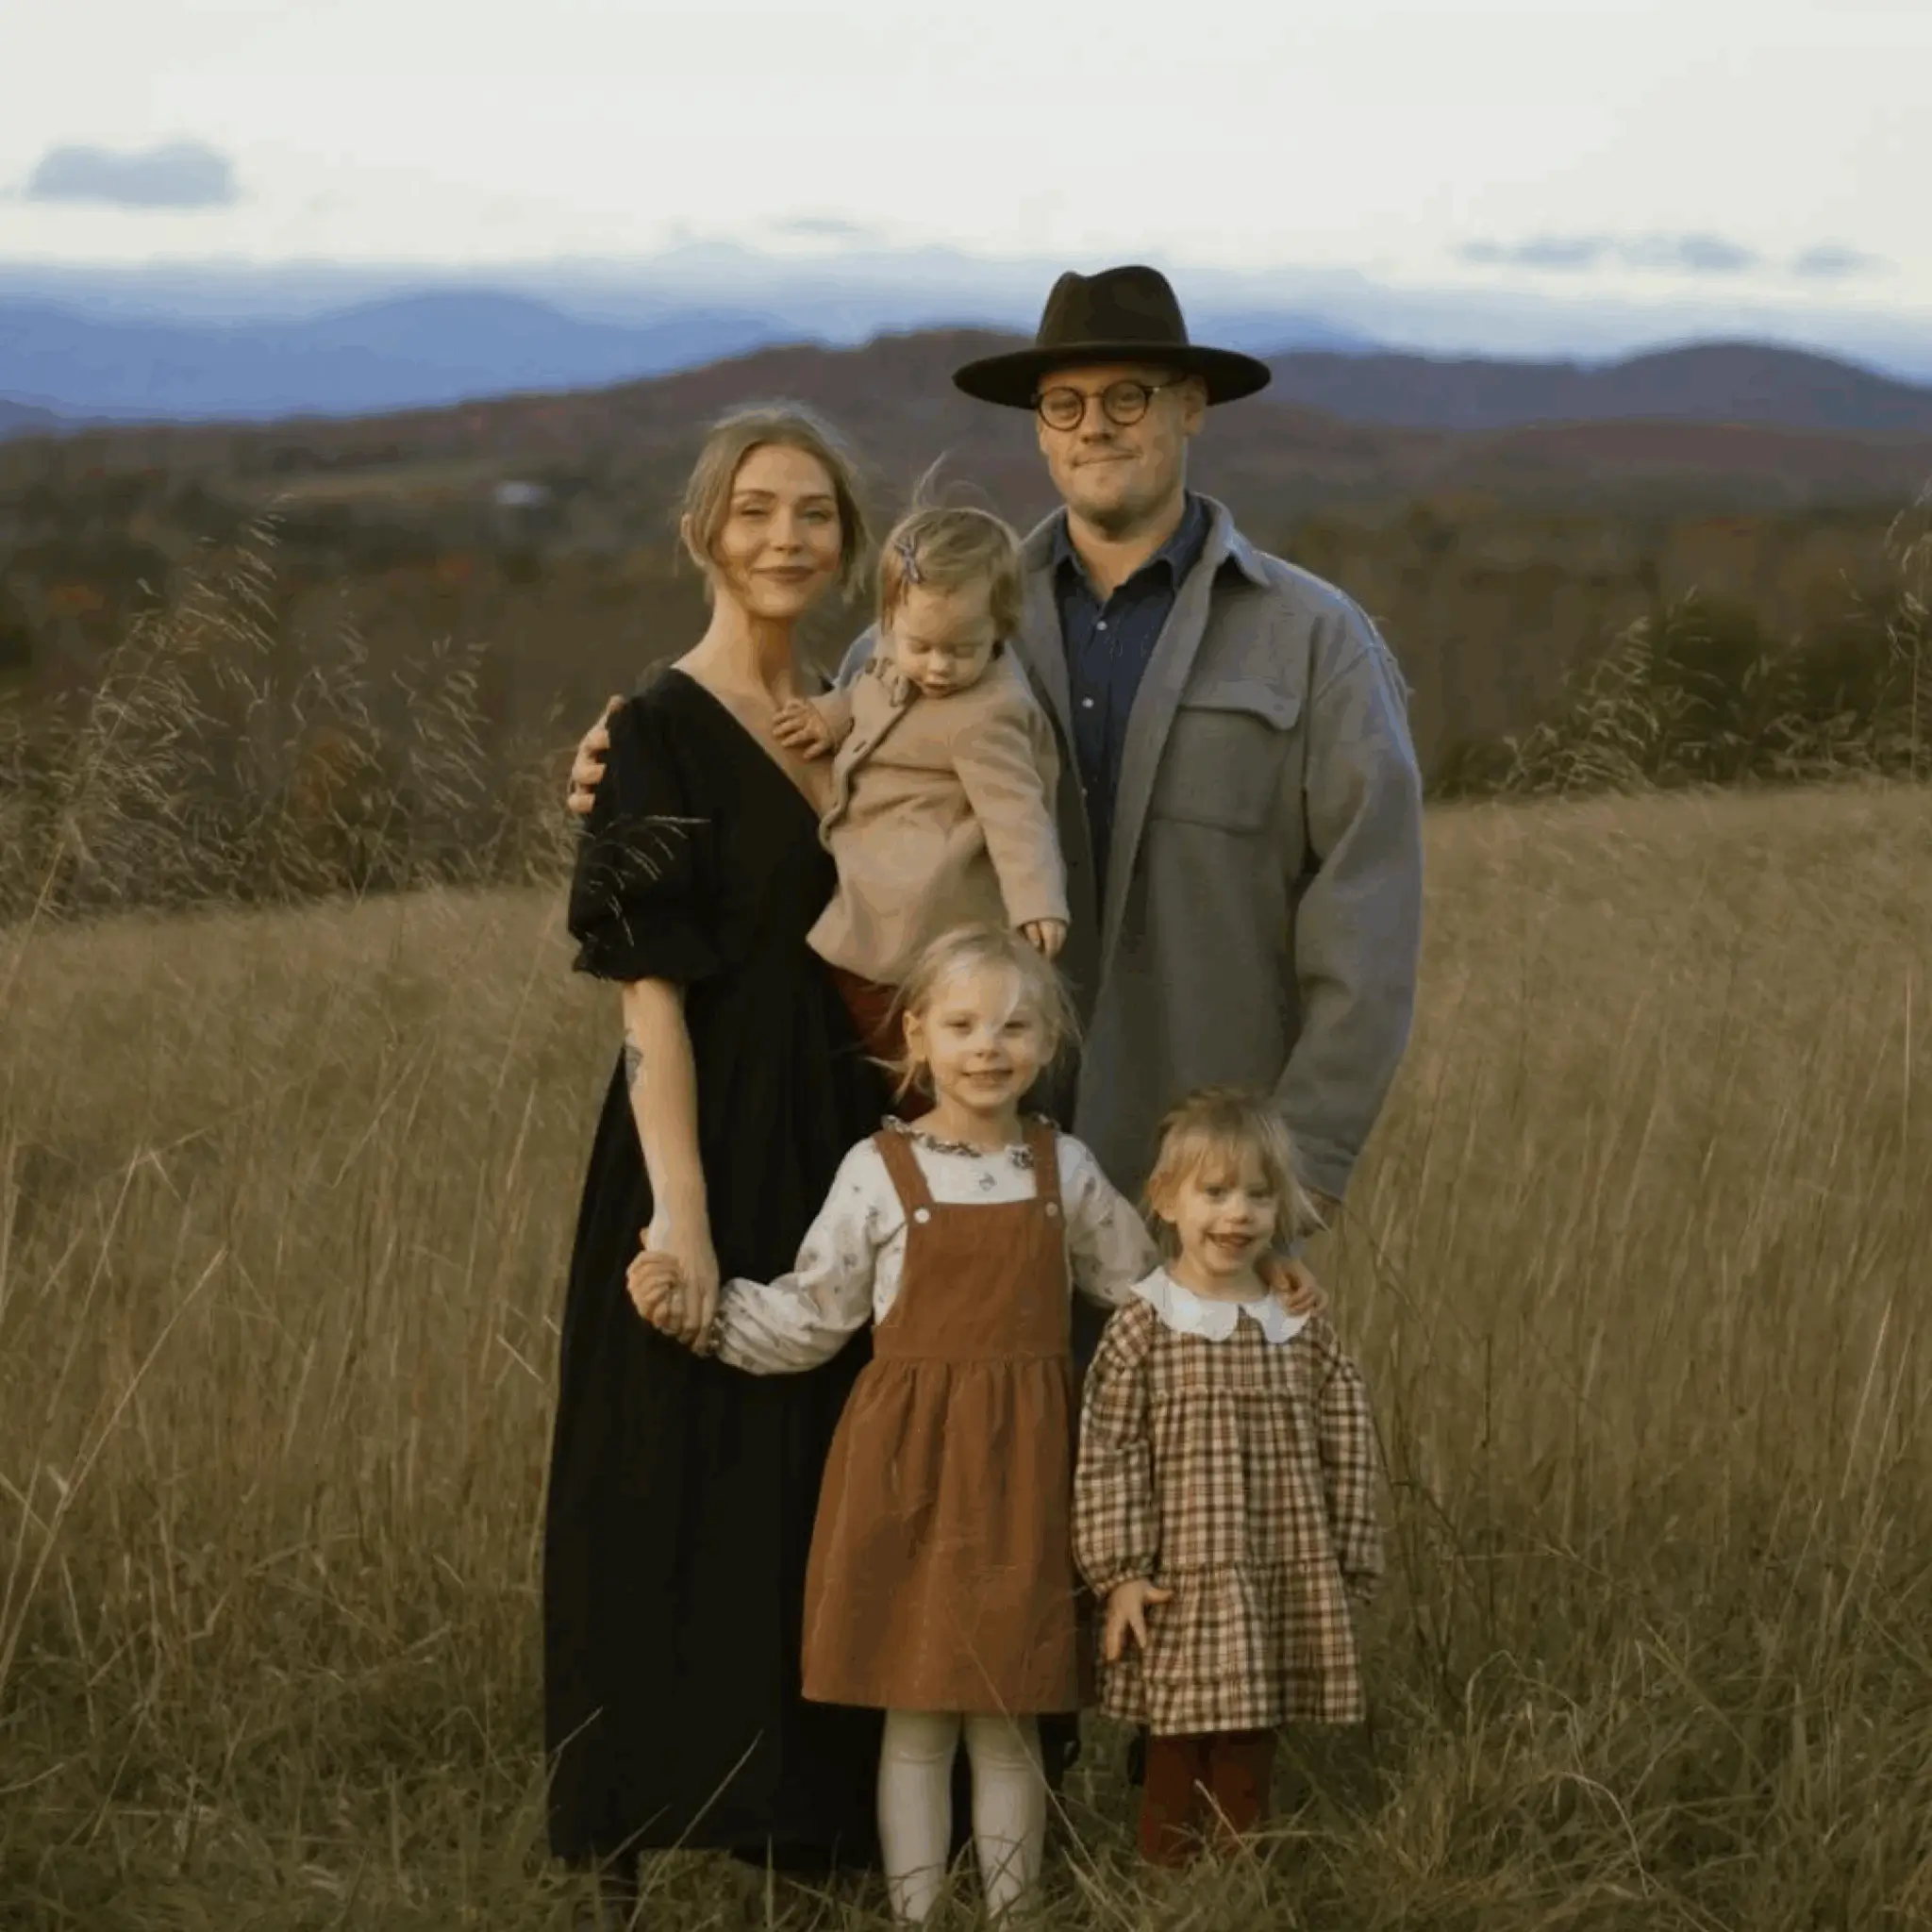
Before vs After using ‘The Esteban Gil Collection – Leo’ AI Style on Aftershoot
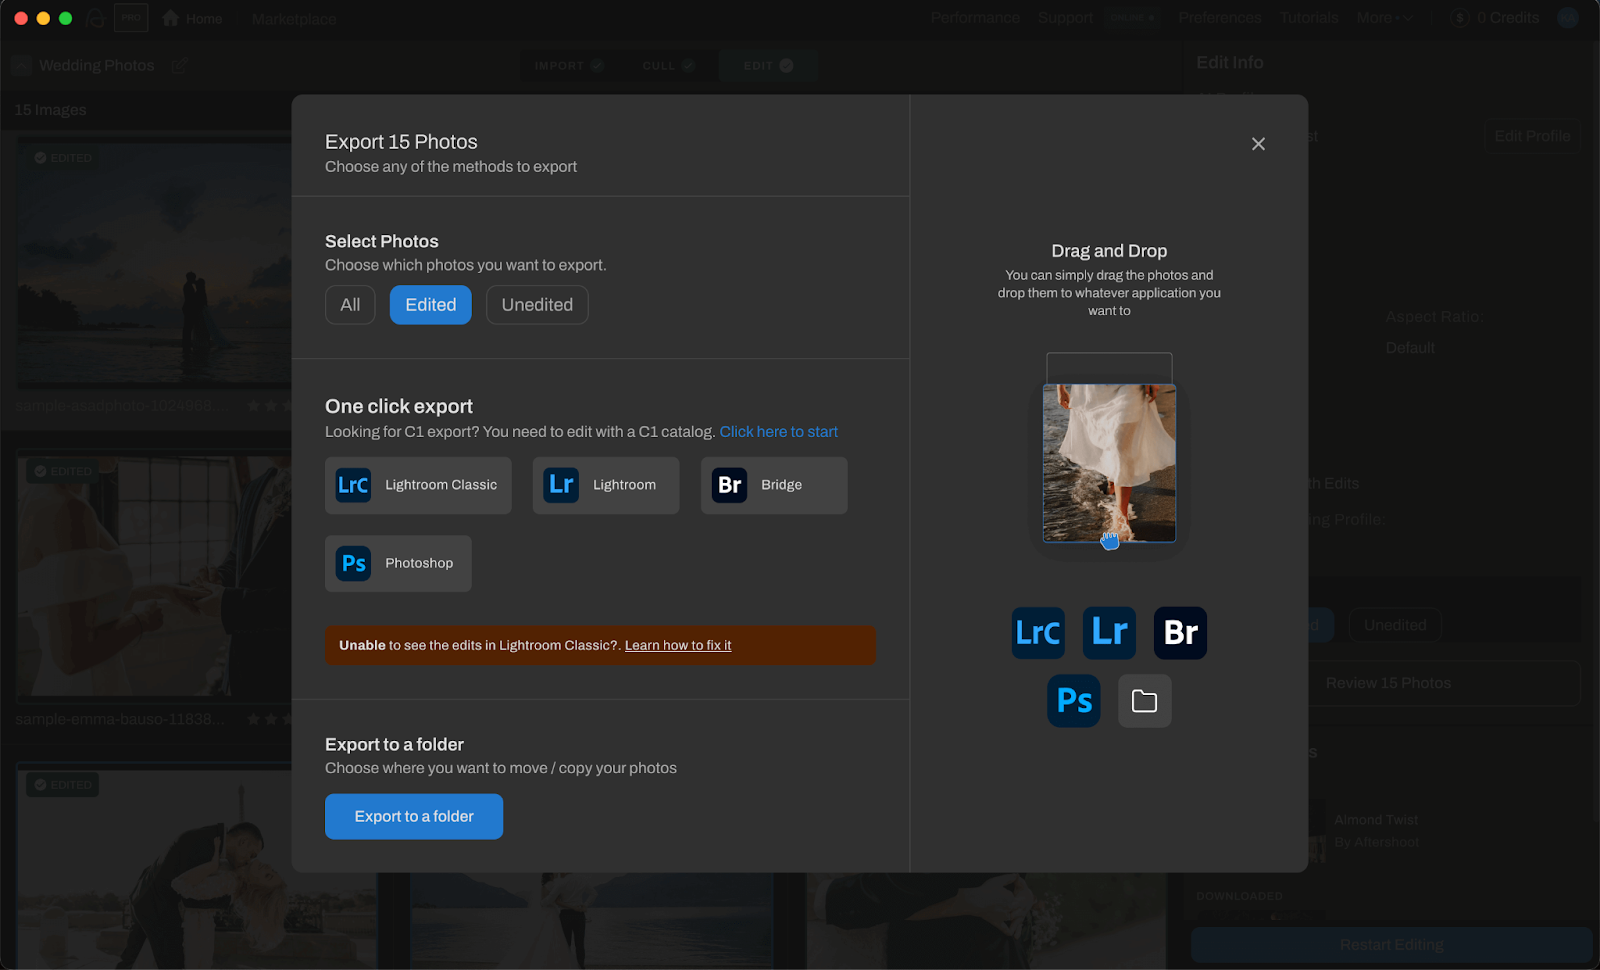
Step 3: Export the edited photos and carry out any creative edits and retouching with Lightroom
AI can get you 80-90% of the way, but your unique perspective as a portrait photographer always shines through in the portrait editing process. That’s why many photographers prefer exporting their AI-edited photos to a traditional editing software like Lightroom to make those final, highly specific adjustments.
This step is where you bring your artistic vision to life, make minor corrections, and polish your portraits to perfection.
Check out this detailed guide on How to Edit Portraits in Lightroom: A Step by Step Guide
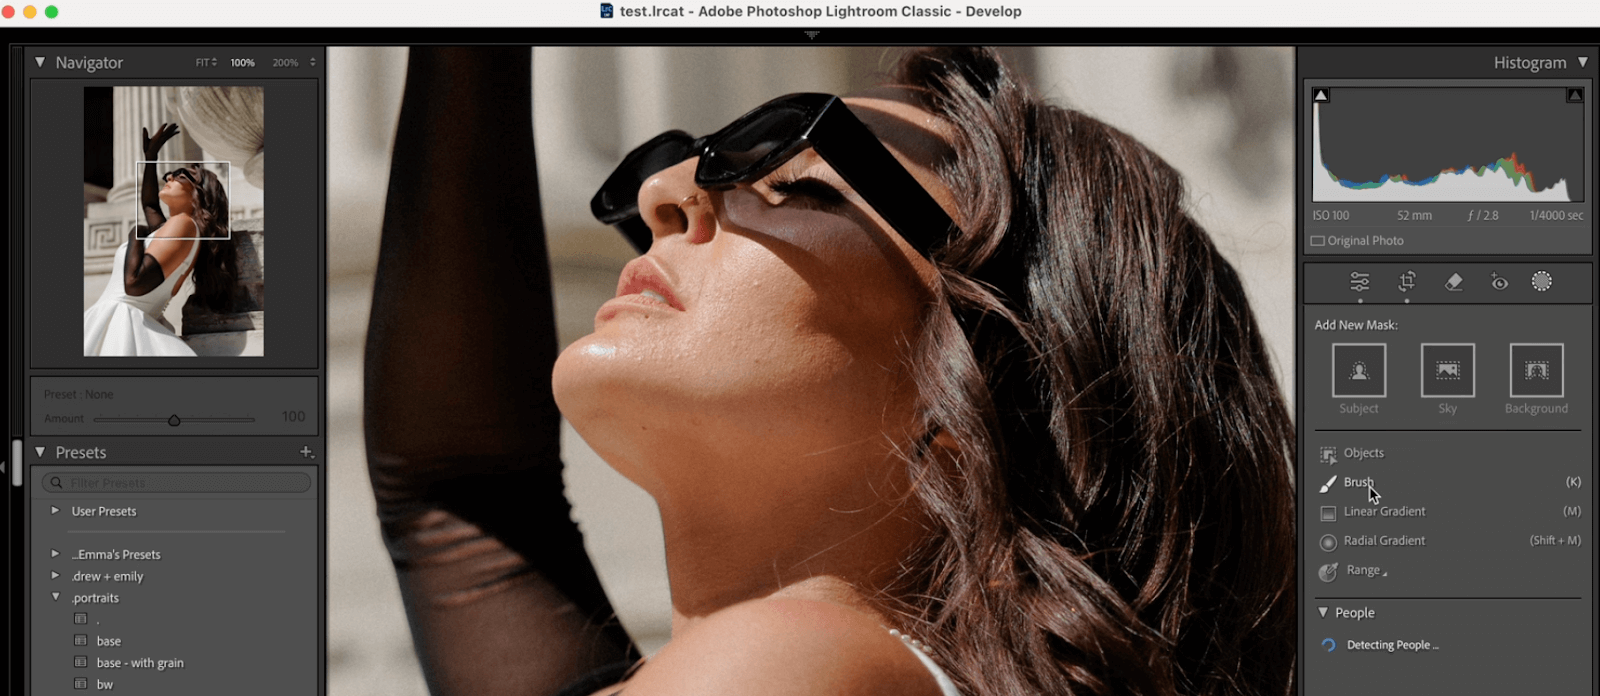
Lightroom offers a vast array of tools for creative portrait editing, including:
- Detailed color correction: Refine skin tones, adjust color grading, and create specific moods.
- Local adjustments: Precisely edit specific areas of your image, like dodging and burning, eye enhancement, and background adjustments.
- Creative effects: Add stylistic effects, textures, and artistic touches to enhance your portraits.
- Advanced sharpening and noise reduction: Further refine image detail and manage noise for a professional finish.
Actionable Steps:
1. Export from Aftershoot to Lightroom
Choose your preferred export settings and seamlessly transfer your processed images.
2. Apply creative edits
You’ll have taken care of some basic adjustments like Exposure, Contrast, Highlights, Shadows, Clarity, and even cropping and straightening in Aftershoot already, so in this step you’ll want to dig deeper into specific images.
Use Lightroom’s extensive tools to refine colors, perform local adjustments and retouching, add creative effects, and perfect the details of your portraits.
If you opted for AI Masking when editing in Aftershoot, whether with or without edits, you can now refine those masks.
3. Batch sync
If you have a series of portraits with similar lighting and style, leverage Lightroom’s batch-syncing capabilities to apply consistent creative edits efficiently.
By strategically using Aftershoot for the initial stages and then transitioning to Lightroom for creative refinement, you create a hybrid workflow that maximizes both speed and artistic control. You’re working smarter, not harder, and delivering exceptional portraits in less time.
Read also: A Complete Guide to Wedding Retouching
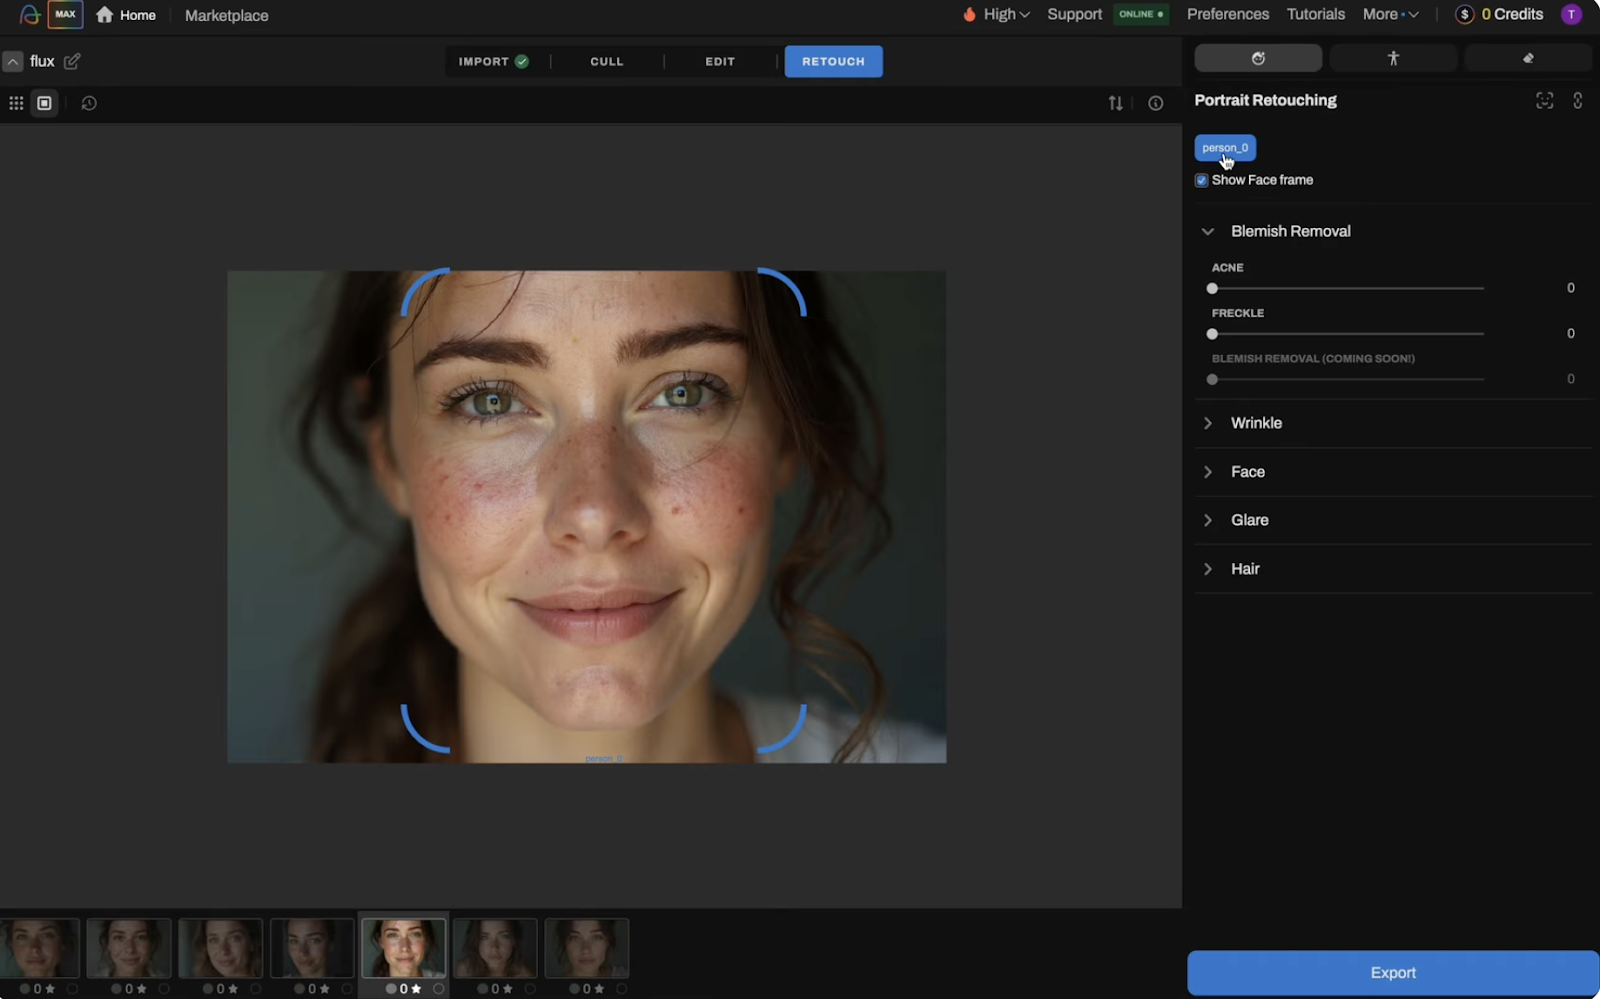
Alternative bonus step: Use AI Retouching to fix the small details directly in Aftershoot
Don’t think we’re done here! We have great news to share. Aftershoot’s AI Retouching tool is currently in Early Release and free to use until September 2025.
With this, you will be able to cull, edit, and retouch your photos — all in one workflow, without ever leaving the app! Now improve your photo retouching workflow in an instant.
Aftershoot’s AI Retouching tool offers:
- Object removal and generative fill
- Skin retouching, including wrinkles, acne, and blemish removal
- Lens glare retouching
- Teeth whitening
- Adjusting eye brightness
- Darkening hair or removing stray hair, and more!
Work Smarter, Not Harder, with an AI-Powered Portrait Editing Workflow
While the perfect workflow will naturally differ for each photographer, embracing AI tools like Aftershoot can serve as a competitive advantage that helps you stand out from the crowd by taking over routine tasks and freeing up your time for creativity.
The portrait editing workflow outlined in this guide is not just about speed; it’s about empowering you to work smarter, unleash your creative potential, and deliver exceptional results that exceed client expectations. Start your free Aftershoot trial today and experience the transformation firsthand.