3 Photography Workflow Tips Every Photographer Should Know in 2026
In 2026, a workflow that really works for you is the difference between drowning or growing when the calendar fills up. A good workflow keeps images organized, keep backups safe, and keep edits consistent from one job to the next.
Most photographers already have a workflow. The question is whether it still works. Deadlines got tighter, delivery expectations got faster, and editing tools changed faster than habits did.
AI has helped smooth the rough edges of post-production in the past few years, and tools like Aftershoot now handle culling, baseline edits, and even first-pass retouching faster than any manual process could. But those gains only matter when they fit inside a workflow that’s already deliberate and stable.
By 2026, AI-assisted editing has gone from novelty to infrastructure. It handles the repetitive steps like culling, base edits, retouching, so the system you build around it decides how smoothly your week runs.
The goal of this guide is to show what a dependable workflow looks like in 2026, detailing where automation makes sense, where manual control still matters, and how professionals are combining both to keep their turnaround quick and their quality consistent.
Key Takeaways: Photography Workflow Tips for 2026
Workflows are now hybrid: AI handles the repetitive stages like culling, baseline edits, and retouching, while Lightroom and other editors remain the control room for final adjustments.
Local speed beats cloud uploads: Most pros now prefer software like Aftershoot that processes images offline, keeping client files private and turnaround consistent.
Consistency outperforms speed: The photographers delivering fastest in 2026 are the ones who built steady, predictable systems, and not necessarily the ones cutting corners.
Volume is normal: Wedding and event photographers are routinely managing thousands of RAW files per week, so automation is more a baseline requirement than an advantage.
Simplicity is resilience: The best workflows have fewer moving parts with clear folder structures, automated backups, and tools that talk to each other without friction.
Reflection is maintenance: Reviewing what slows you down and adjusting quarterly is how modern pros stay ahead of shifting tech and client expectations.
If you strip away gear, software, and style, there are some principles that make a workflow reliable in 2026. That’s exactly what we’ll uncover in this article.
What is the Best Photography Workflow for Photographers in 2026?
By 2026, the word “workflow” finally means something again. Most working photographers have stopped chasing the next preset or shortcut and started refining the systems that keep their week sane. AI now handles the mechanical parts; culling, base edits, first-pass retouching, while judgment and timing stay human.
The 2025 Aftershoot Photography Industry Report gathered responses from more than a thousand working photographers around the world.
Our 2025 photography industry report focused on tracking and measuring the shifts AI-powered workflows have brought for early AI adopters in photography, and we found some fascinating insights and leaps that happened sooner than anyone expected.
Automation has now become part of the professional standard.
– 81% said their work-life balance improved.
– 64% said clients couldn’t tell when AI-assisted edits were part of the final gallery.
– Turnaround times dropped by more than half, and many described finally having the time and mental space to focus on the creative parts again.
Before you jump into the nitty-gritty of fine-tuning your workflow, learn what the pros are doing to stay ahead of the curve. With insights from the report and this step-by-step guide, you should have a pretty solid mental model for a well-oiled photography post-processing workflow in the next ten minutes.
Get a free copy of the report here ↓

The best workflow in 2026 is defined by how well your tools connect. Every step talks to the next. The files you import are clean. The edits you hand off are predictable. The system holds its shape even when the schedule doesn’t.
Here’s what that looks like in practice:
- Import and organize with intent: A clear folder structure is still the quietest form of control. Store everything on a fast SSD and mirror automatically to a RAID or cloud backup.
- Cull efficiently, without losing judgment: Aftershoot handles the first pass for focus checks, duplicates, near-misses, then you start from the images worth spending time on. The Workflow Revolution report identified culling and first-pass editing as the biggest time wins in the shift to AI for most pro photographers.
- Run AI baseline edits for instant consistency: Train an AI Profile in Aftershoot to match your look. Lightroom or Capture One takes over for creative polish. The edit already feels like yours; the rest is nuance. Lightroom’s current AI tools, Generative Remove and Lens Blur, now extend that baseline, keeping more finishing work in one workspace.
- Retouch for realism, not effect: Aftershoot Retouch cleans up distractions while keeping texture intact. Subtle, even corrections always outlast heavy-handed ones. Adobe’s Reflection Removal (in Camera Raw preview) is the next quiet improvement and fewer round-trips for glass and window work.
- Export, back up, and deliver predictably: Keep file paths identical for every client, automate archiving, and track turnaround. Aftershoot’s research showed client satisfaction rose as delivery times dropped.
- Review your system quarterly: Workflows age the same way software does. Check what’s slowing you down. Import lag, export queues, syncing errors, and fix them before the next season starts.
The best workflow offers steadiness with a system that stays reliable when you’re tired, overbooked, or staring down another 4,000-image weekend.
So, how do you become a master in post-processing? These three tips are your keys to unlocking a more structured and productive workflow.
- Shoot in the correct format: RAW
- Organize your files and equipment
- Leverage tools to streamline your photography workflow
Let’s get into them in more detail.
1. Shoot in RAW (And why that matters even with AI workflows)
Every photographer knows to shoot in RAW, but now it’s for both, flexibility AND data fidelity. For the uninitiated, RAW is practically a religion. It’s the closest digital equivalent to capturing the pure, untouched light of a moment, making it indispensable for professional work where every pixel counts and creative vision is paramount.
It’s why we suffer through massive file sizes, slower buffer rates, and a more intensive workflow; because the potential in that uncompressed data is limitless.
A RAW file captures everything the sensor sees. It holds full tonal range, color depth, and shadow detail. That information gives editing software and AI models the context they need to make accurate color and exposure decisions.
When you train an AI profile, it can only reflect your look if it sees the same detail you did when you built that style. JPEGs compress and discard data in skin tones and gradients that algorithms can’t rebuild. RAW keeps those subtleties intact, so the baseline edit Aftershoot generates starts closer to your intent.
RAW files also keep your archive ready for the future. As Lightroom and Aftershoot release new AI features like Generative Remove or tone-aware profiles, the uncompressed data in those files allows the system to reprocess older work with the same precision as new images.
Shooting in RAW remains one of the simplest ways to protect creative control. It gives both you and your tools the full picture to work from, keeping your style consistent as technology changes.
And then there’s… JPEG.
JPEG is like that overly enthusiastic intern who tries to “help” by summarizing your complex report into a bullet-point list, then throws away the original. It compresses, it discards data, it applies in-camera sharpening and saturation you didn’t ask for, and it bakes in a white balance you might later regret. It’s fine for quick shares or web thumbnails, but for anything serious? It’s the photographic equivalent of ordering a gourmet meal and having someone microwave it for you. It’s the reason we get grey hairs trying to fix an image that could have been perfect.
When they hear JPEG, pro photographers go..
Shooting in RAW is the cornerstone of a smooth photography workflow. It provides you with the raw material to unleash your creativity, maintain the highest image quality, and have complete control over your final results.
2. Organize Your Files & Equipment
One of the most critical steps in ensuring a smooth and efficient photography post-processing workflow is maintaining an organizational system right from the beginning.
The import stage decides how organized the rest of the process will be.
Most working photographers begin by transferring cards directly to a fast SSD or RAID system rather than a single external drive. Solid-state storage cuts down on import lag, and redundancy protects the job if hardware fails mid-week. File paths should be predictable: ClientName/YYYY-MM-DD_ShootType/RAW as a base folder keeps everything traceable months later.
Aftershoot enters here. When you import through Aftershoot, it automatically builds previews and begins culling in the background. That saves time and also sets a clean foundation for the AI editing stage that follows. Because the software reads metadata and camera profiles at import, you don’t waste time regenerating previews or re-sorting files later.
While the software handles its analysis, you can start the backup. A simple 3-2-1 photography backup plan—three copies, two media types, one off-site—remains the safest approach. One copy lives on your working SSD, one mirrors to a NAS or desktop RAID, and one syncs to a cloud service like Backblaze or Dropbox overnight. The key is to automate the mirror rather than rely on manual drag-and-drop.
At the end of this stage you should have:
- One clearly named master folder per job.
- Verified backups in at least two locations.
- Aftershoot already running cull previews so the edit can start immediately.
A clean import process sounds procedural, but it’s what allows speed later on. When file paths stay consistent and backups happen automatically, the rest of the workflow—AI editing, retouching, delivery—can run without interruption.
Pro Tip: Consider a convention like “Event_Date_Location” when naming your files. For example, if you photographed a wedding on October 15, 2023, in New York, your file could be named “Wedding_2023-10-15_NewYork.”
3. Leverage Tools to Streamline Your Photography Workflow
Technology is your trusted ally, and it’s especially useful when it comes to streamlining your workflow.
Whether you want to enhance your post-processing, optimize client relationship management, or smoothen the delivery process, there are numerous tools at your disposal.
Let’s look at tools to speed up the post-processing workflow.
Culling and selection
Culling is one of the most mentally demanding parts of the job. It’s where technical review meets judgment, and it’s also where most photographers lose hours they can’t bill for. Going frame by frame dulls attention, and that fatigue shows later in the edit.
A clean system keeps that from happening. Start by grouping images by sequence or setup so you can compare variations together. This is where automation earns its keep. Tools like Aftershoot handle the first mechanical pass for detecting sharpness, focus, expression, and duplicates, so you’re only reviewing what might actually make the final cut.
The point isn’t to let software decide for you; it’s to remove the noise that hides good work. You still choose, but you do it faster and with a clearer head.
For photographers handling heavy client volume like weddings, events, studio sessions, this stage determines how efficiently the rest of the week runs. The difference between spending three hours or thirty minutes culling isn’t just time; it’s the energy you still have left to make creative calls later.
Once the selection is locked, flag the keepers or export directly into Lightroom. Consistent labeling and metadata at this step keep every file aligned for the edit.
How Aftershoot Supercharges the Photography Workflow
Aftershoot’s AI software shines as a culling and editing virtuoso. It’s not just a matter of saving time; it’s about elevating the quality and consistency of your final images.
By doing all of this within a matter of minutes, Aftershoot helps you produce high-quality images faster than ever.
Aftershoot’s cutting-edge culling algorithms streamline your image selection process, identifying and recommending the best shots based on various factors, such as:
- Sharpness
- Focus
- Duplicates
- Emotion
- Composition
- Closed eyes & blinks
The culling feature is customizable with sensitivity sliders, allowing you to adjust the criteria based on your needs and preferences.
Aftershoot also offers an impressive AI-powered editing feature that replicates your personal editing style with 90%+ accuracy.
It can edit 1,000 images for you in under a minute!
Features of the editing function include:
- AI cropping & straightening
- AI masking
- Adjustments for brightness
- Tone curves
- Exposure
- Vibrance
- Highlights & shadows
- White balance, and more
To use the editing software, you’ll need to create an AI Profile by uploading at least 2,500 previously edited images from your Lightroom or Capture One Catalog to the Aftershoot app.
The AI then learns your unique editing style and uses that information to replicate your adjustments onto the unedited photographs you add for editing.
Alternatively, you can use a pre-built AI Profile called AI Style, found in the Aftershoot Marketplace.
Both culling and editing products are integrated into one app that runs locally (no internet connection needed), making it super convenient and effortless to go from shooting to photo delivery in no time.
Improving Project Management & Client Communication
Optimizing project management and client communication is another key to unlocking a more productive and less stressful photography post-processing workflow.
There are fantastic tools in the form of Customer Relationship Management (CRM) software that will streamline client management and communication, ultimately saving you valuable time.
CRM software provides a centralized hub for all client information, from contact details to project specifics.
It simplifies scheduling, automates appointment reminders, and ensures you’re always in the loop about upcoming projects.
Furthermore, integrating an online proofing gallery into your workflow can significantly enhance the proofing and delivery process.
It creates a smoother experience for both you and your clients, allowing them to review and select their favorite images with ease.
Incorporating productivity tools into your workflow isn’t just about convenience; it’s about delivering a better experience for your clients and allowing you to focus on what you love most – capturing moments.
Whether it’s AI for post-processing, CRM for client management, or proofing galleries for smoother interactions, technology is your passport to a more efficient post-processing workflow.
How to set up a Photography Workflow post-production?
Setting up an efficient photo workflow helps streamline your entire process from shooting to delivering the final product. A faster client delivery means you can take on more projects and do what you love. Let’s discuss step by step how we can set up a post-production workflow
Step 1: Backup
The first step to having an efficient workflow is always backing up your photos. We’ve already spoken about keeping your files organized to ensure a smooth process. Back up your images immediately to an external drive or cloud storage for safekeeping.
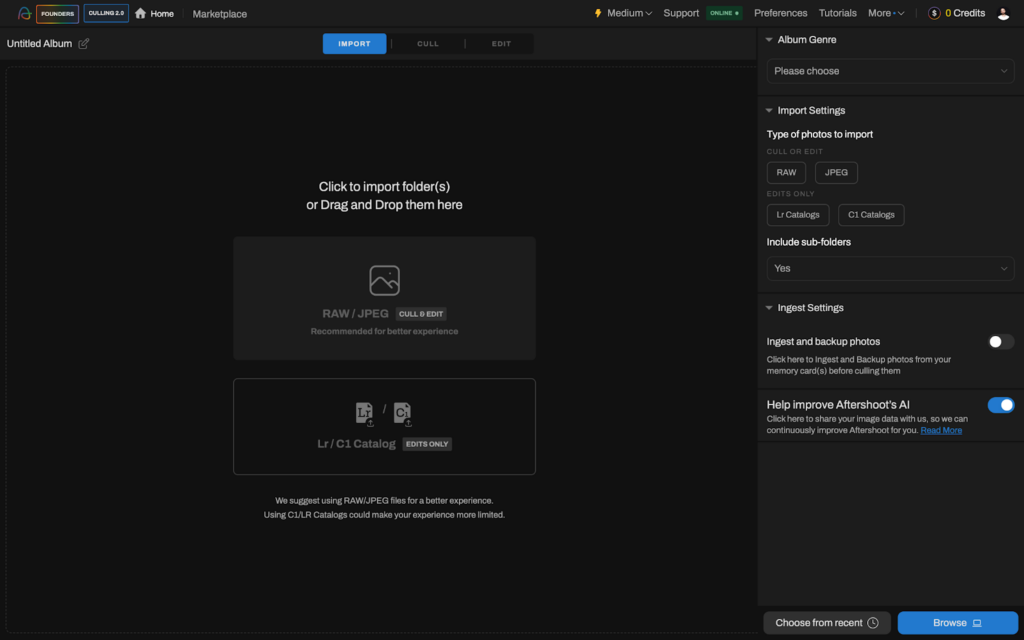
Step 2: Import your photos
Import your photos to your photo editing tool. We recommend using Aftershoot to streamline your workflow. So all you need to do is open Aftershoot, click on the options based on your preferences and you are all set.
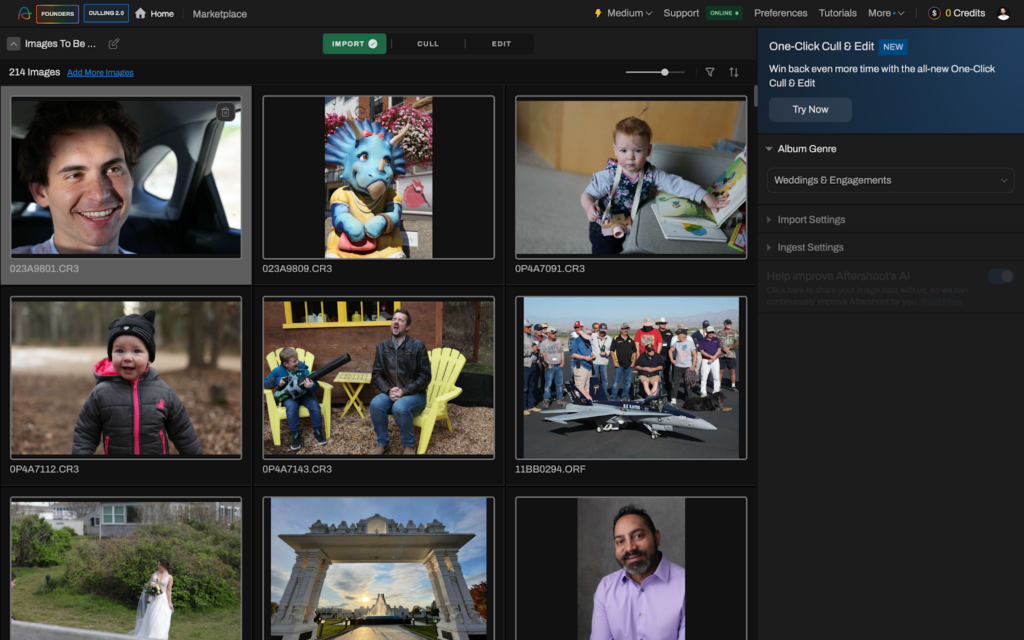
Step 3: Cull your photos
Cull your photos on Aftershoot based on your preferred settings. Arrange selected images into folders by date, event, or client name. Apply consistent naming conventions for easier retrieval and sorting.
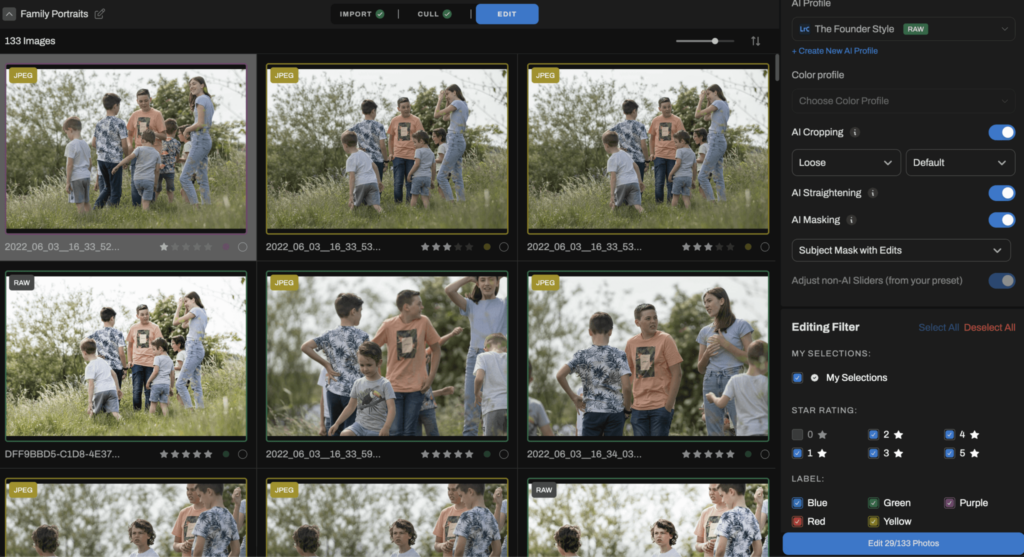
Step 4: Edit your images
Once your images have been culled, you can start editing your images on Aftershoot. Select your AI profile (i.e an AI editing profile trained with your unique editing style) or AI style (pre-built AI presets) to edit your photos.
Next, select all your editing preferences and click the edit button.
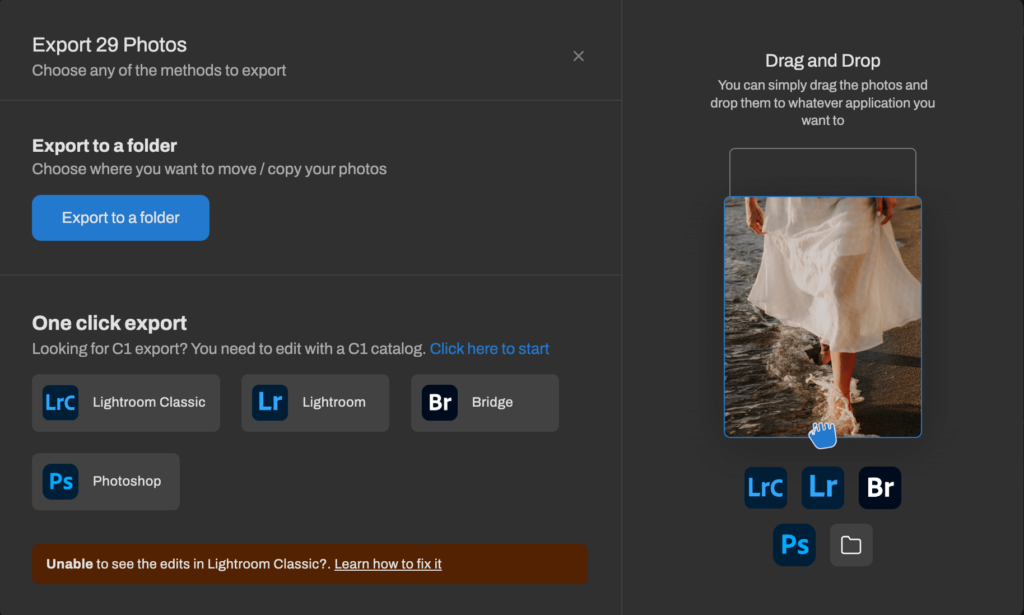
Step 5: Export and Review
Once your edit is complete, you’ll receive both an in-app notification and an email. To begin reviewing your images, simply click on “Review” in Lightroom or Capture One, or choose “by” to see a list of your preferred apps, ready for further adjustments. Prefer manual control? You can always export the images and review them at your own pace!
Building an Efficient Workflow
A well-structured workflow is your ace in the hole for triumph. We hope these workflow tips for photographers will reshape your photography journey into a more productive and efficient experience.
An efficient photo editing workflow brings the assurance of better time management, amplified creativity, minimized stress, swifter deliveries, and the capacity to expand your photography business. We hope you’ll put these insights into practice, embrace structure, and unleash your creativity.
Experience the transformative power of a streamlined workflow with a free 30-day trial of Aftershoot. No credit card necessary!
Our AI software can free you from hours of tedious work, granting you more time to capture beautiful moments and spend time with loved ones.
In the end, it’s not just about capturing images; it’s about creating a seamless workflow that empowers you to excel in your passion and profession.
If you’re interested in more photography tips – from shooting and business to post production and creativity – take a look at our list of top photography podcasts.
Happy shooting!
Quick Answers: Modern Photography Workflow FAQs (2026 Edition)
1. What’s the most efficient photography workflow in 2026?
A hybrid one. Most pros now use AI to handle culling and base edits in Aftershoot, then refine color and tone in Lightroom or Capture One. That balance keeps turnarounds fast without flattening your style.
2. How does AI actually help photographers work faster?
It takes over the repetitive parts of sorting, exposure correction, and first-pass retouching. Aftershoot handles thousands of RAWs locally, freeing your time for decisions that need judgment.
3. Which part of the editing process should stay manual?
Anything that affects tone, color balance, and storytelling. Let AI build your baseline, but keep creative control in the final edit. The tools speed up the process but you should keep control of your look.
4. What software works best with Lightroom in 2026?
Aftershoot remains the smoothest fit. It sends culled and edited images back to Lightroom with ratings, color labels, and metadata intact. No re-sorting or lost previews.
5. How do professionals keep edits consistent across lighting and cameras?
They train AI Profiles on their own finished edits. Aftershoot learns how you shoot and edit, then applies that baseline automatically. It keeps skin tones and color balance steady, no matter the light or setup.
6. How do photographers protect their files and edits long-term?
They follow a 3-2-1 backup rule: three copies, two media types, one off-site. Aftershoot works locally, so your client data stays on your drive and is fast, private, and secure.
7. Are AI-edited images really accepted by clients?
Yes. Aftershoot’s 2025 report found that 64% of clients couldn’t tell the difference between AI-assisted and manual edits. What matters is consistency, not the method.

