The thing about newborn photography is it’s beautiful, tender, and completely chaotic.
Babies squirm. They blink. They yawn and stretch mid-shot. So naturally, you shoot a lot and you promise a gallery that’s polished, cohesive, and dreamy. But between client calls, shoots, and snack breaks, post-processing starts to eat your time.
That’s where smart editing workflows come in because faster editing means quicker delivery, which means happier clients and more referrals.
This guide will walk you through pro-level newborn photo editing tips, from culling to retouching to final delivery, plus how AI tools like Aftershoot can become your secret weapon.
Why Newborn Editing Workflows Break Down (And How to Fix Them)
Most editing workflows fall apart when things get hectic, especially with newborn sessions where every second counts.
Photographers often spend hours:
→ Manually sorting through hundreds of nearly identical shots
→ Retouching skin carefully to avoid an over-edited, fake look
→ Rebuilding their editing style from scratch every single session
And when deadlines hit? Creativity takes the backseat.
But what if your workflow looked more like this:
→ AI flags closed eyes, soft focus, and missed moments before you even start culling
→ Your editing style applies across the full session in just a few clicks
→ Skin retouching looks soft and natural — never plastic
That’s exactly what this guide is here for. We’ll show you how Aftershoot fits into your workflow and how to make the process work with you, not against you.
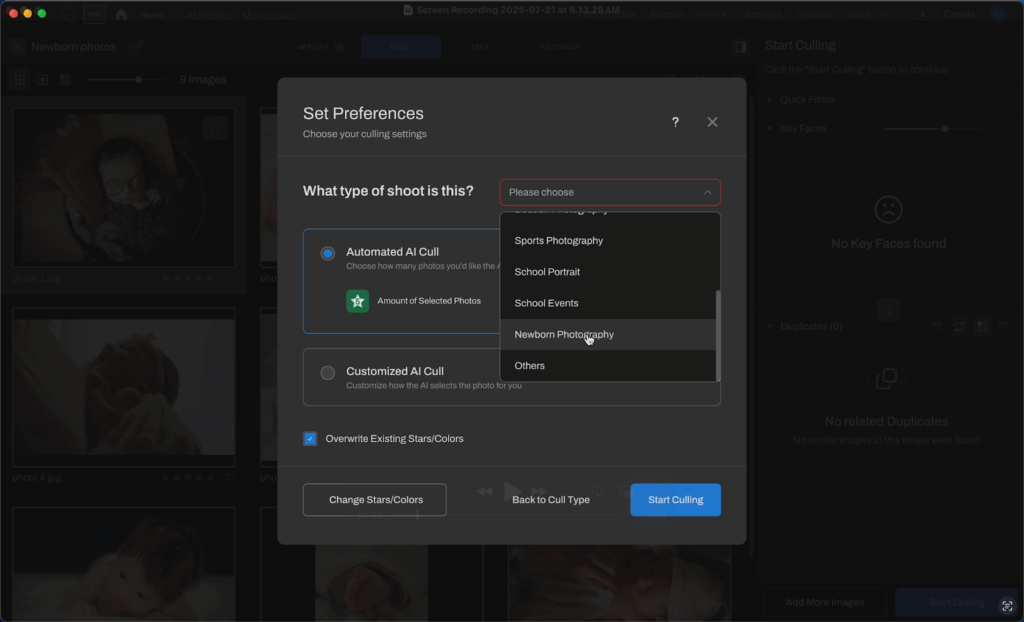
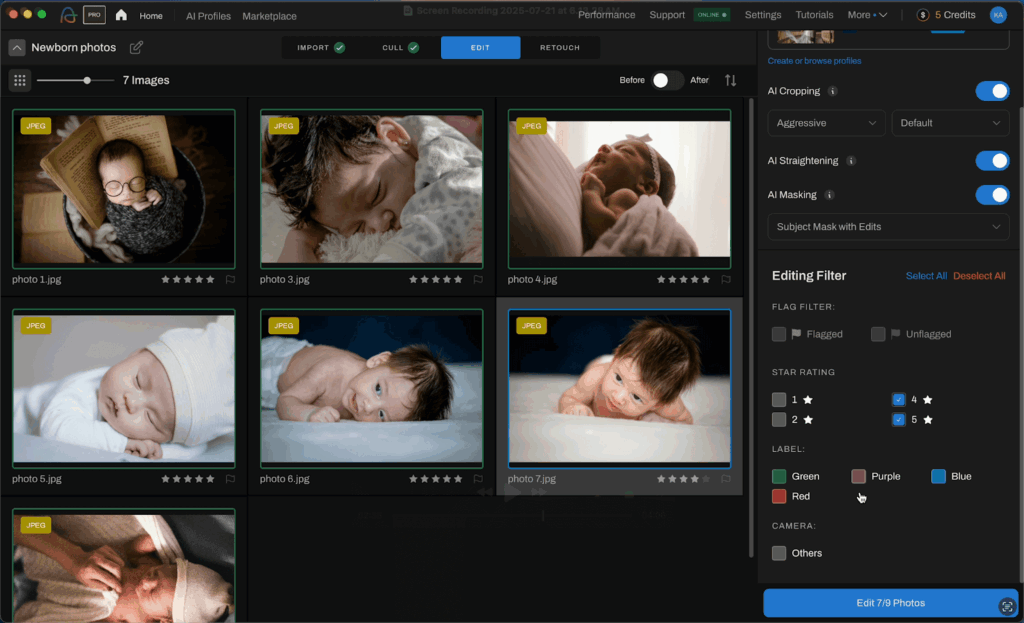
Tip #1: Start with Smart AI Culling
Newborns are so damn cute, you want to keep every shot. But a strong gallery needs flow and intention, not 12 versions of the same swaddle pose. Let AI group the duplicates, flag the best, and sort the rest. You’ll still make the final call. But the grunt work? That’s done in minutes.
Instead of manually scrubbing through hundreds of images looking for open eyes and sweet expressions, pro photographers use AI tools like Aftershoot to do the heavy lifting.
It analyzes your session in minutes, groups similar shots, and flags the best ones based on sharpness, expressions, and more. You still make the final call, but the grunt work is done before you even begin.
Pro Tips:
- Keep the best 5–10% per pose/setup.
- Use the extra time to prep your editing style or, I don’t know, use that extra time to prep your editing style or get yourself some water.
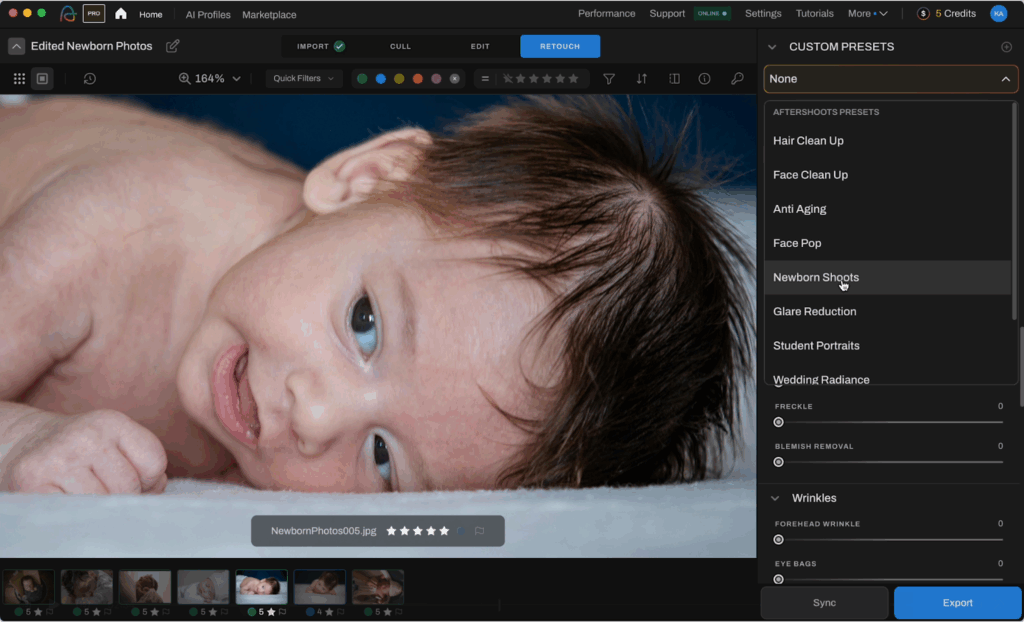
Tip #2: Apply Your Editing Style with Batch Processing
Before you start retouching every blemish or flake of dry skin (which you shouldn’t, unless the parents ask), make global adjustments first. Think of this like priming your canvas.
Newborn shoots often lean warm or cool, depending on your light setup. Fixing the white balance and exposure upfront helps everything else fall into place.
With Aftershoot’s batch editing feature, you can apply your preferred style across the entire session. No need to repeat the same corrections on each photo. Use AI Editing Styles from our Creator Marketplace, or train your own AI style to learn your unique approach to editing.
If you’d like recommendations, here are some of the most well-loved ones from our users:
Pro Tip: Go for a natural look and don’t overedit. Normalize contrast, highlights, and shadows, all without blowing out that dreamy softness.
Tip #3: Gentle Skin Retouching for Natural Results
Newborn skin isn’t flawless, and that’s part of the charm. Babies often have discoloured skin, flaky skin, stork bites, or acne. But because these are temporary, parents often prefer to get them edited out.
Depending on their preferences, it’s your job as their photographer to polish the photos without giving off a plastic look.
Instead of nuking the texture, keep things soft and realistic.
Common issues to fix:
- Flaky skin around the forehead and cheeks
- Red patches or purple hands/feet
- Milia or baby acne (go light here)
Pro Tip: Always zoom out to sanity-check: does the baby still look real?
This is where the systems you’ve built will come into play. Many photographers rely on presets and Photoshop actions to help them achieve natural effects without spending hours retouching.
Pro photographers leverage AI retouching tools like Aftershoot to gently smooth and retouch baby skin while preserving that newborn glow.


Tip #4: Polish the Details Without Overdoing It
This is often where a good photo becomes great.
Clean out distracting elements, smooth out blankets or wraps, and use cloning or healing tools and masks (even better if you’d used AI subject masking in the editing stage) to refine the environment around your subject.
You can use an AI tool like Aftershoot to make this part quick and seamless. Make the eyes brighter with face retouching, remove stray objects that are distracting from your subject with object removal, dewrinkle clothes (coming soon!), smooth down stray hairs, and so much more.
Don’t overdo it. Just a gentle polish to let the baby shine.
Tip #5: Crop with Intention for Better Storytelling
Cropping is more than cleanup. It’s storytelling.
Use crops to highlight tiny toes, a sibling’s kiss, or the way a baby curls into mom’s hands. Keep the baby in focus and avoid mulling over distracting environmental elements. This is where you have to consider the larger story in your album and compose photos like a director.
Favorite crop ratios for newborns:
- 4:5 for print-ready portrait vibes
- 1:1 for Instagram grids and close-ups
- 16:9 if you’re planning slideshows or video covers
Pro Tip: Cropping also fixes slightly tilted beds or off-center props without reshooting. You can also use generative fill tools to fill in backgrounds where required.
Tip #6: Leverage AI Tools to Accelerate your Workflow
The pros aren’t just playing around with AI anymore. They’ve actively built systems around it to save their time and energy for the truly creative tasks.
Fortunately, it’s never too late to incorporate faster workflows.
Tools like Aftershoot help you:
- Cull your photos in minutes, instead of hours. (You still have final say in which pictures to include!)
- Batch edit thousands of photos instead of a manual first pass. This is where you can apply global edits, color correct, crop, and apply masks.
- Retouch and sync your edits across your album without spending hours in Photoshop.
It learns from your style and applies it consistently across sessions. That means you keep your unique look while freeing up hours in your week.
Think of AI as your in-studio assistant; one that doesn’t get tired or miss deadlines.
“Aftershoot saved me hours! Love using Aftershoot with my workflow, it has made my life so much easier. They take on recommendations, listen to feedback, and on top of that the support team is excellent. So happy I made the jump years ago!”— Thu Pham-Moore
Ready to cull, edit, and retouch with one tool? Try Aftershoot free for 30 days
Tip #7: Add Your Signature Style Last
Once all the clean-up is done, it’s time to let your creativity and personality shine. This pass is why your clients come to you and not just any other photographer.
What about your portfolio appealed to the parents? Is there a specific effect you’re known for?
Bring all of that out to paint your pictures with your unique artistry and brand of style, whether that’s gradients, vignettes, or more. Don’t skip the final review pass; it’s your name on the gallery, after all.
Tip #8: Save, Backup and Deliver Like a Pro
You’ve done the creative work. Now make sure it’s safe.
You might do this already, but it’s a good idea to segregate photos according to stages: RAW, Edited, Social, Delivered, Portfolio, etc.
Make sure to create backups, within external hard drives or cloud storage like Dropbox, Google Drive, or Lightroom Cloud to keep your hard work secure.
As for delivery, use galleries like Pixieset or Pictime to deliver memories like a pro.
Wrap-Up: Faster Editing = Happier Clients (and More Naps)
Newborn sessions are magical. Your editing workflow should be too.
The faster and smarter you edit, the more time you have to grow your business, connect with clients, or sneak in a nap or few (we won’t tell).
I hope you walk away with a new newborn photo editing process after reading this article – or at least a few tips that will help you make it a little more efficient.
And if you’re ready to go all in and edit photos the way the pros do it… so you can focus on the storytelling?
FAQs on Newborn Photo Editing
What settings should I use for newborn photography?
Shoot wide (f/2.0–f/2.8) for a nice portrait look. Keep the shutter speed fast (upwards of 1/200), the ISO low (100–400), and use soft natural light whenever possible. If you’re not used to shooting manual, use Aperture Priority Mode and set it to your lowest aperture to create a shallow depth of field.
How do you edit newborn skin?
Gently! Fix redness and smooth flakiness, but avoid over-editing. Use Aftershoot for a first pass and go into Lightroom or Photoshop to sort out the smaller details.
What’s the best editing software for newborn photography?
Lightroom is currently the go-to for photographers of all shapes and sizes. For an all-in-one workflow, AI tools like Aftershoot integrate well to handle culling, batch editing, and retouching in one go.
How do I keep my edits consistent across sessions?
Save and apply presets, or use Aftershoot’s style-based editing that learns from your past galleries.
Should I use presets for newborn photos?
Absolutely! Just be sure to adjust for skin tones and lighting per session.