Most photographers open Aftershoot for one thing: to get through their edits faster. That’s why Ernesto’s video hits such a nerve. He starts by admitting English isn’t his first language, but it doesn’t matter, because Aftershoot meets photographers where they are: different languages, different workflows, different needs.
And that’s really the point: Aftershoot is built for real working photographers, not perfect, single-language, single-camera scenarios. Which is why the features Ernesto shares in this walkthrough aren’t the flashy ones everyone already knows.
These are the underrated Aftershoot features photographers rarely don’t notice until you need them—when a client asks for “that one guest,” when you switch between three lenses at a wedding, when your assistant prefers to work in Spanish, or when you want clean edits without training a profile first.
In this article, we’re breaking down each of Ernesto’s underrated favorites, why they matter, and how they fit into a real photographer’s workflow. If Aftershoot has already sped up your process, these are the features that make it feel effortless.
Why These Aftershoot Features Are Underrated
Most photographers use Aftershoot for culling or editing but overlook the workflow-saving tools built into the app. These features aren’t flashy, but they’re the ones that quietly eliminate friction, speed up decision-making, and help you deliver faster during busy seasons.
If your workflow still feels clunky even after switching to AI, you’re not alone. Most photographers only use a fraction of what Aftershoot can streamline. All of the features in this article are available in the free trial, so you can test them on your next gallery without changing anything about your current workflow. These are the features photographers don’t use enough — but the ones that quietly save hours when deadlines stack up.
TL;DR: Ernesto’s top underrated Aftershoot features
In this short walkthrough, Ernesto highlights the features in Aftershoot that quietly save photographers hours. These underrated Aftershoot features are especially powerful for photographers who want speed without sacrificing control.
Here’s what he covers in the video:
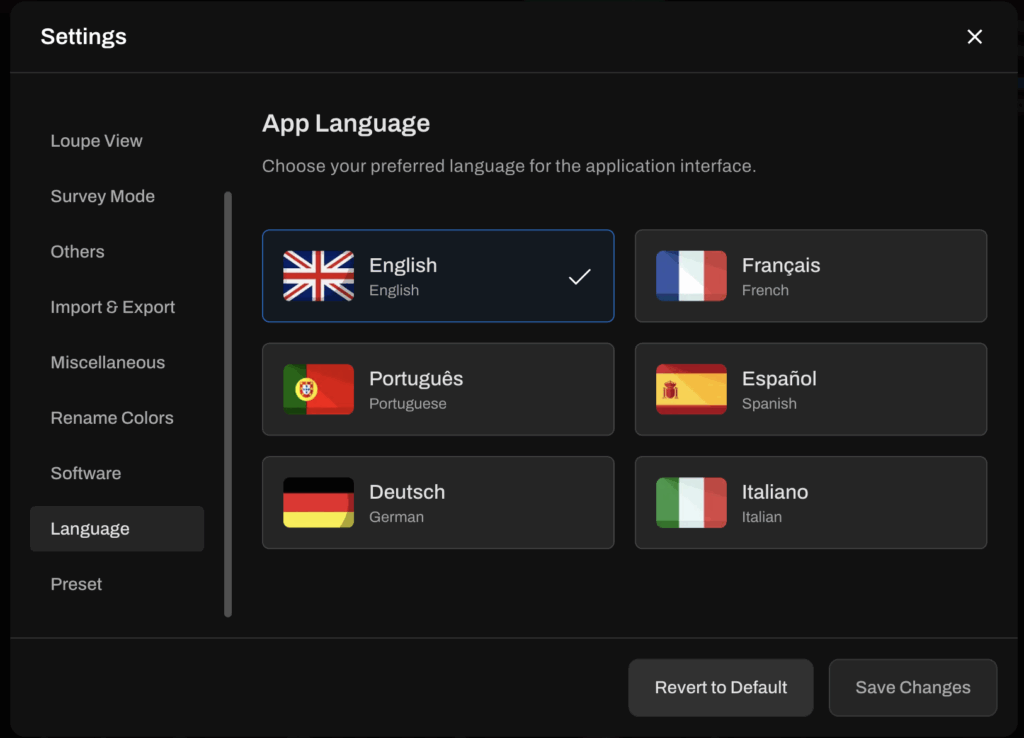
- Multilingual support: It works in English, Español, Português, Français, Deutsch, and Italiano, making it easier for teams, assistants, and international shooters to work seamlessly.
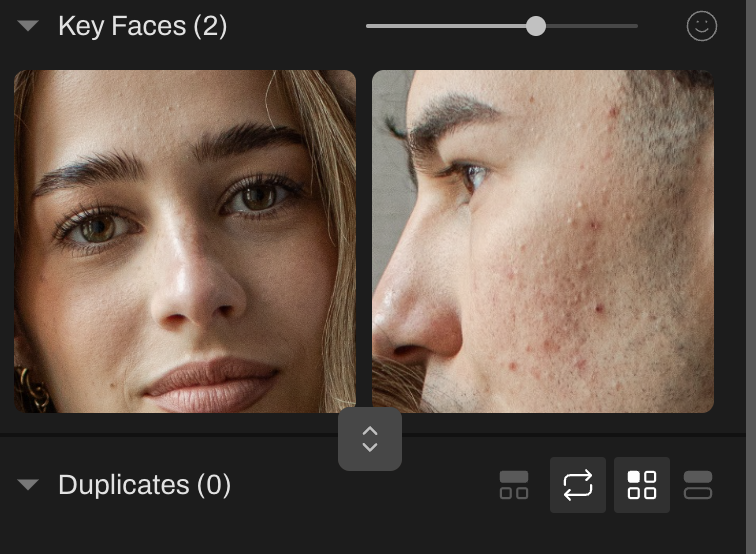
- Key faces: Instantly see every face detected in a photo so you can quickly find specific people or spot who’s smiling without scanning shot by shot.
- Keyboard shortcuts panel: Press one key to reveal every shortcut for faster culling, swapping, selecting, rating, and navigating (more on this later in the article)
- Marketplace Profiles: Download ready-made AI editing profiles created by pro photographers like Anna Roussous, Cassidy Lynne, and more, and test different styles before building your own.
- Adjustable AI Profiles: Fine-tune contrast, tone, color behavior, and exposure tendencies inside Aftershoot to match your exact editing preferences.
- Advanced Filters: One of Ernesto’s favorites. Filter your entire shoot by camera body, brand, lens, or gear combo to instantly find the shot you remember taking.
Now let’s break down each feature in detail. We’ve also added one extra underrated gem that isn’t in the video, so keep reading…
1. Multilingual support
“English is not my first language, but that’s no problem because Aftershoot is in English, Español, Portuguese, French, German, and Italian. I don’t speak all those languages, but Aftershoot does.”
Which means your workflow doesn’t fall apart the moment someone on your team prefers a different language.
This is the first thing Ernesto calls out in his video, and for good reason. A lot of photographers work with second shooters, assistants, or editors who aren’t fluent in English. Normally, that means extra back-and-forth, mislabeled folders, or simple mistakes that happen because someone couldn’t read a menu option.
With Aftershoot, changing the language is literally a two-click move inside the Options → Languages panel. That tiny detail makes a big difference when your second shooter prefers Spanish, or your editor works more comfortably in Portuguese, or you’re recommending the software to a colleague overseas.
It’s not a flashy feature, but it’s one of those workflow touches that shows the product is built for real working photographers. And that alone removes friction from a surprising number of team workflows.
2. Key faces
This feature highlights every person detected in a photo, allowing you to quickly find specific subjects, check expressions, or confirm who’s looking at the camera without scanning the image by image. It’s one of the most underrated Aftershoot features because it solves a workflow problem every event and wedding photographer deals with daily.
If you shoot weddings, events, or family sessions, you already know the pain. A client asks, “Do you have a photo of my aunt from the reception?” You know you took it… somewhere.
But finding it means digging through a sea of similar frames.
This is where Key Faces earns its keep.
When you open an image, Aftershoot automatically displays the faces it detected in that photo (a visual index of who’s in the shot). This makes it easy to find a specific guest or family member, spot closed eyes or missed smiles in group photos, verify that everyone is actually looking at the camera, or ensure you didn’t miss an important person in the final selects.
Ernesto shows this in the video when he’s searching for one individual in a group image:
“I open Key Faces, and I can see every single person in that group photo. That’s how I find the person I was looking for without going image by image.”
This is one of those features photographers don’t realize they need until the first time a couple asks you for “just one shot of Grandma during speeches,” and you find it in seconds instead of twenty minutes.
3. Keyboard shortcuts panel
Aftershoot has a full set of keyboard shortcuts for faster culling and editing and most photographers never realize there’s an in-app cheat sheet you can open at any time.
If you’re serious about cutting hours off your workflow, shortcuts matter. Clicking slows you down. Reaching for the mouse slows you down. Aftershoot makes this easy: tap the little keyboard icon, and you get a full overlay with every shortcut available.
Ernesto walks through it in the video:
“Just press this key here, and you have all the different shortcuts. A to add photos, S to swap, D to add to your selection, open grid view, assign stars and colors… everything is right there.”
Here’s a quick overview of Aftershoot’s keyboard shortcuts
- A → Add
- S → Swap selected image
- D → Mark as selected
- U → Undo
- X → Clear the Star Rating AND Color Label of an Image
- 6 → assign the color Red
- 7 → assign the color Yellow
- 8 → assign the color Green
- 9 → assign the color Blue
- – → assign the color Purple
And moreee…
For high-volume photographers, this is where real speed comes from. If you’ve been using Aftershoot mostly with your mouse, this one feature alone can shrink your culling time dramatically once it becomes second nature.
4. Aftershoot Marketplace
If you’re new to Aftershoot Edit or haven’t built your own AI profile yet, Marketplace lets you download ready-made styles and start editing immediately without any training catalog or setup delay.
One of the biggest barriers photographers face with AI editing is the assumption that they need to train a perfect profile before they can get usable results. Ernesto addresses this directly in the video:
“Say you’re new to Aftershoot and want to edit your event, but you haven’t created your own AI profile. What do you do? Just go to Aftershoot Marketplace and find a profile you like.”
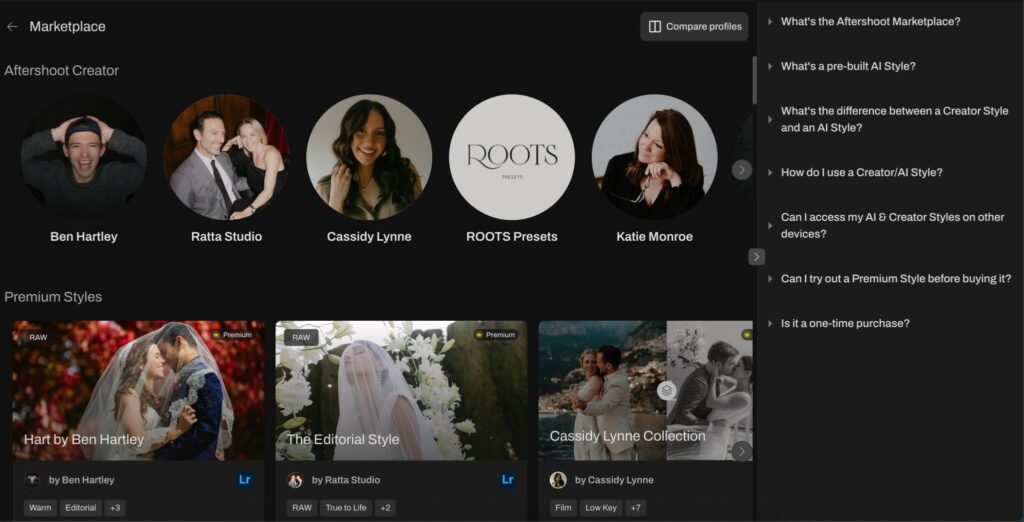
Marketplace is a curated library of AI editing profiles designed by pro photographers, for photographers. You can browse different looks, preview before/after examples, download profiles for free, test multiple styles on your own images, and find something close to your preferred aesthetic before committing to a custom profile.
This is especially helpful for:
- new users who want to see quick results,
- photographers still refining their personal style,
- second shooters who need consistency with a lead shooter’s look,
- editors handling multiple genres (portraits, weddings, events, etc.).
It removes the biggest psychological barrier to AI editing: you don’t have to start from scratch. Marketplace lets you begin editing today and refine later.
5. Instant AI Profiles
Instant AI Profiles let you turn any Lightroom preset into an AI editing style in under a minute. Just upload your preset, adjust three sample images, and Aftershoot builds the profile for you.
This isn’t something Ernesto covers in the video, but it’s a feature photographers should absolutely know about because it removes the biggest barrier to trying AI editing: the setup.
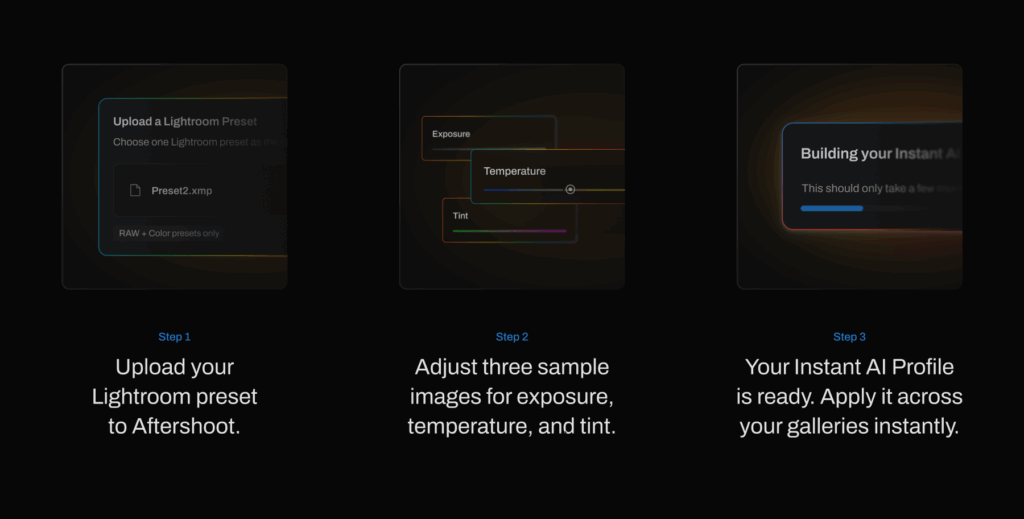
Here’s how Instant AI Profiles work
- Upload your Lightroom preset to Aftershoot.
The preset becomes the visual foundation of your AI profile. - Adjust three sample images.
Just three. You dial in exposure, temperature, and tint so Aftershoot understands how you correct your preset. - Your Instant AI Profile is ready.
Apply it across entire galleries instantly. Aftershoot handles the adaptive adjustments while keeping the preset aesthetic intact.
Who this is perfect for
- Photographers who rely heavily on presets
- Anyone who wants to try AI editing without building a full profile
- New Aftershoot users who want to start editing right away
- Editors who need quick style variations for different genres or clients
- Photographers scaling from 5–10 sessions to 20–30 per month
You get the look you already trust just delivered at AI speed.
6. Edit Profile adjustments
Whether your profile came from Marketplace or your own trained model, Aftershoot lets you fine-tune every part of it—contrast, exposure, tones, color shifts, and more, so the edits match your style perfectly.
This is the part photographers don’t always realize they have control over. You’re not locked into a downloaded profile or your AI editing profile. You can shape it to fit your preferences the same way you’d tweak a preset inside Lightroom, except here, the profile remembers your adjustments going forward.
Ernesto demonstrates this clearly in the video when he tweaks a Marketplace profile:
“If I’m not quite liking the contrast, I can adjust it. I can set a fixed value, like minus 20, or I can let AI lower or raise it depending on my selection.”
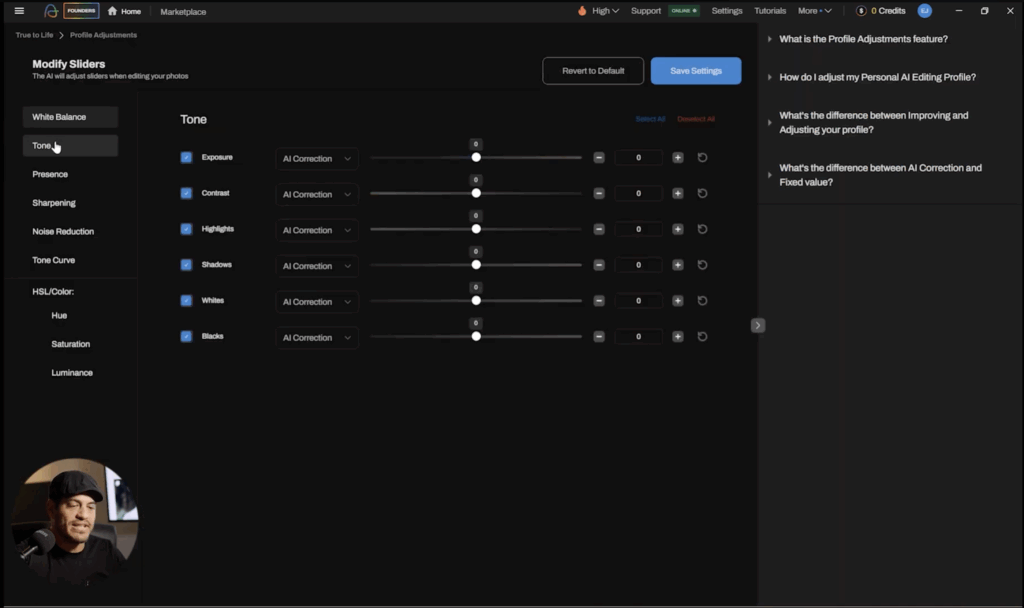
You can adjust settings like:
- Contrast
- Exposure correction behavior
- Temperature and tint tendencies
- Highlights and shadows
- Vibrance and saturation
- Specific color behavior in HSL
- More advanced tone and color controls depending on the profile
It’s a “set it once and forget it” kind of feature that pays off every time you edit a new gallery.
Who benefits most:
- Photographers obsessed with consistency
- Editors who manage multiple shooters
- Wedding and portrait photographers who shoot in changing light
This is how you take an AI profile from “good” to “this looks exactly like I edited it.”
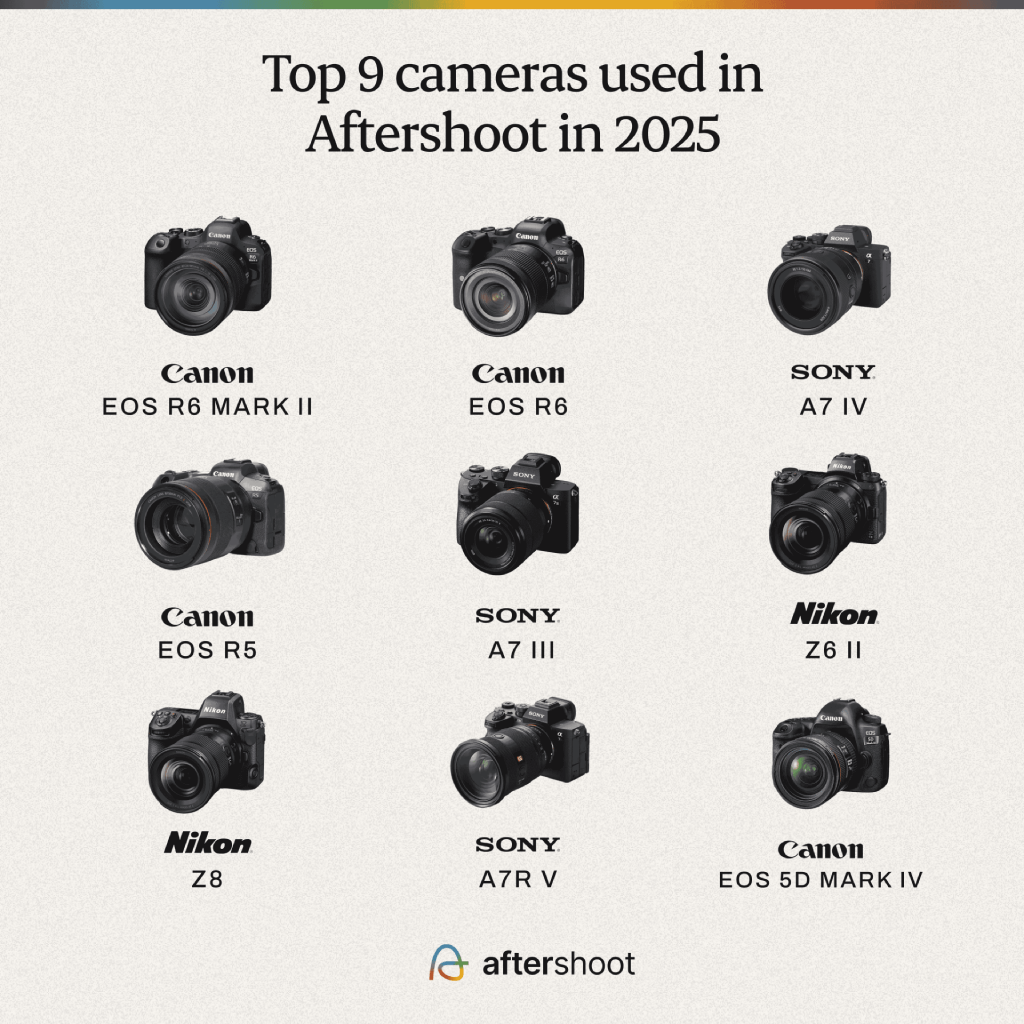
7. Advanced filters
When you’re shooting weddings, events, or multi-camera sessions, Aftershoot’s advanced filters let you instantly isolate images by camera model, lens, or specific gear combinations, making it ridiculously easy to find the exact shot you remember taking.
This is the feature Ernesto calls his personal favorite in the video, and it’s easy to see why. Every photographer knows the situation: You know you shot that moment, and you remember the lens you used. But you have no idea where the image is buried in a 2,000-photo gallery.
Ernesto walks through this exact scenario:
“Let’s say I shot this event with two cameras and different lenses. If I remember, I used my Sony with the 16–35, I just choose Sony, choose the lens, and voilà, the images I shot with that combination are right there.”
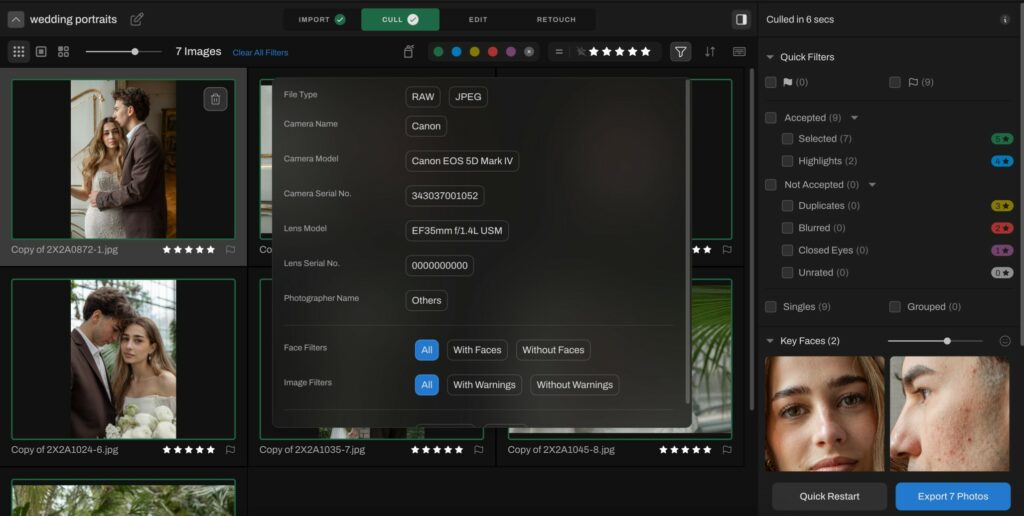
Advanced filters let you
- Filter by camera brand (Sony, Canon, Nikon, Fuji… anything you used)
- Filter by camera model
- Filter by lens
- Combine filters to narrow down exact shooting setups
- Instantly surface the photos you shot with a specific body + lens combo
This is one of those features you use once… and then wonder how you ever lived without it.
Why You Should Start Using These Underrated Aftershoot Features Today
Ernesto’s walkthrough is a good reminder that the features that matter most aren’t always the ones in the spotlight. It’s the little things that save you during busy season.
Aftershoot already handles the heavy lifting. These underrated tools handle everything else in between, so your workflow doesn’t break down when the real-world chaos hits. If you haven’t tried them yet, start with one on your next gallery. Once you start using these underrated Aftershoot features, your entire workflow becomes faster, cleaner, and more predictable. 30 Days on us!